Getting Started
Required Assets
Before we begin building our UBF project, you’ll need a few assets to work with. For this tutorial, we’ll be using a range of 3D models and textures for both the Party Bear and his wardrobe. You can download the starter asset pack from the Asset Creator Pack Additionally, ensure you have installed compatible versions of UBF Studio and UBF Previewer. For installation instructions, see the Installation and Setup sections for the respective apps:Creating a UBF Project
Let’s again begin by launching UBF Studio and creating a brand new project. Select ‘Create Project’ in the welcome screen, then navigate to a suitable location on your drive and create a new folder to store your project. You can name it whatever you prefer, but for this tutorial, we’ll use “UBF - Bear Necessities.” Once the folder is created, navigate into it and select “Create Project” to initialize your UBF workspace.Project Setup & Importing Assets
In Bear Necessities, we’ll be dealing with a broader range of assets than in our previous starter project. To keep everything neat and easy to navigate, let’s begin by organizing our workspace right from the start. Firstly, download and unzip the Bear Necessities Starter Pack into your newly created project folder. This ensures that all the relevant 3D models and textures are placed directly within your UBF Project. After extracting, return to UBF Studio and open or refresh your project. You should now see a folder hierarchy resembling the one below:Build-A-Bear—Laying the Foundations
It’s time to bring our Party Bear to life! Before we start on any accessories, we first need to establish a solid foundation. In this section, we’ll walk through the process of creating and configuring our base bear blueprint. We’ll break this into three key stages: first, prepping our blueprint and wiring up some reusable logic; second, spawning our bear and giving him a glorious fur coat; and finally, bringing him to life with a pair of expressive, customizable eyes.Bear Bones—Creating Our Blueprint Structure
- Creating the Bear Blueprint
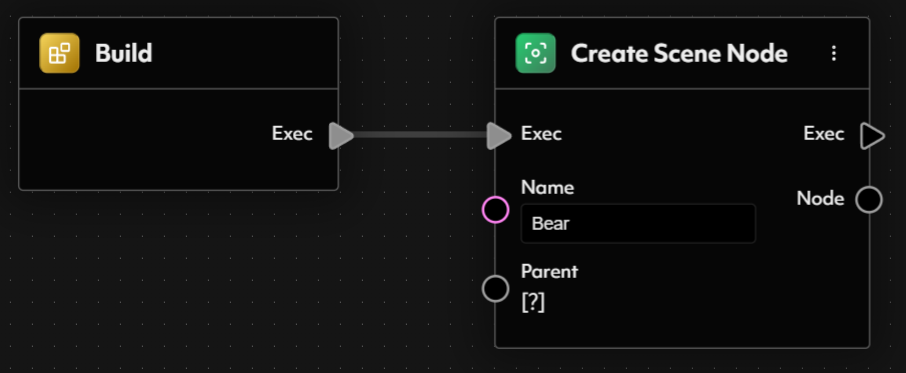
- Creating a Scene Node
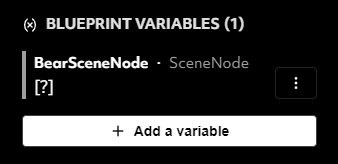
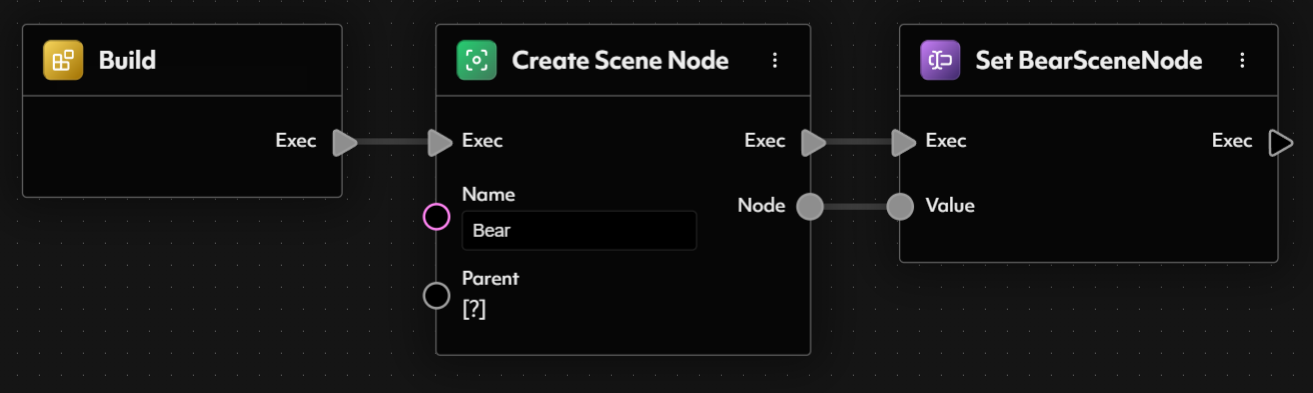
- Storing the Scene Node in a Blueprint Variable
- Set the Variable Type to SceneNode.
- Give it any name you like, we will choose BearSceneNode.
- Drag it directly from the Variables Menu in the Blueprint Inspector into the viewport.
- Alternatively, you can open the Create Node menu and search for Get BearSceneNode.
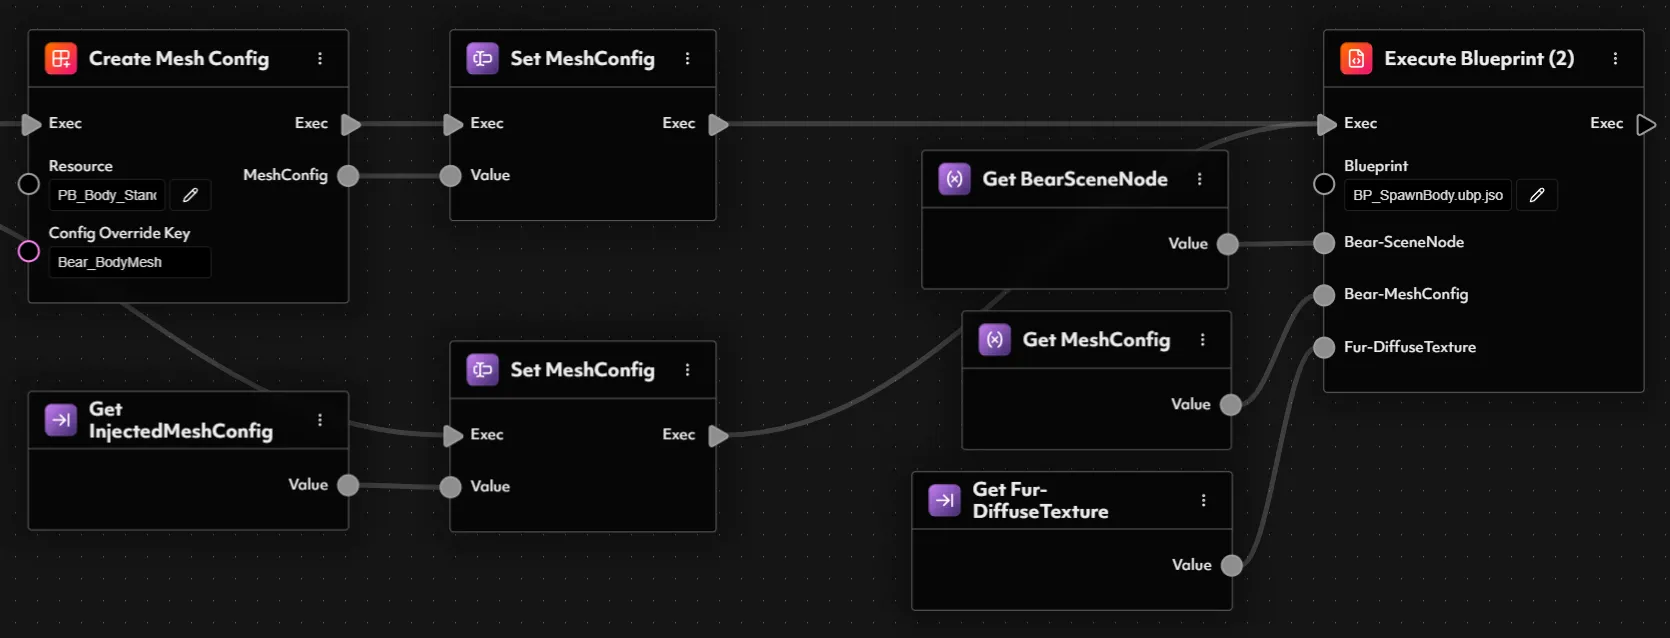
- Leveraging Mesh Configs
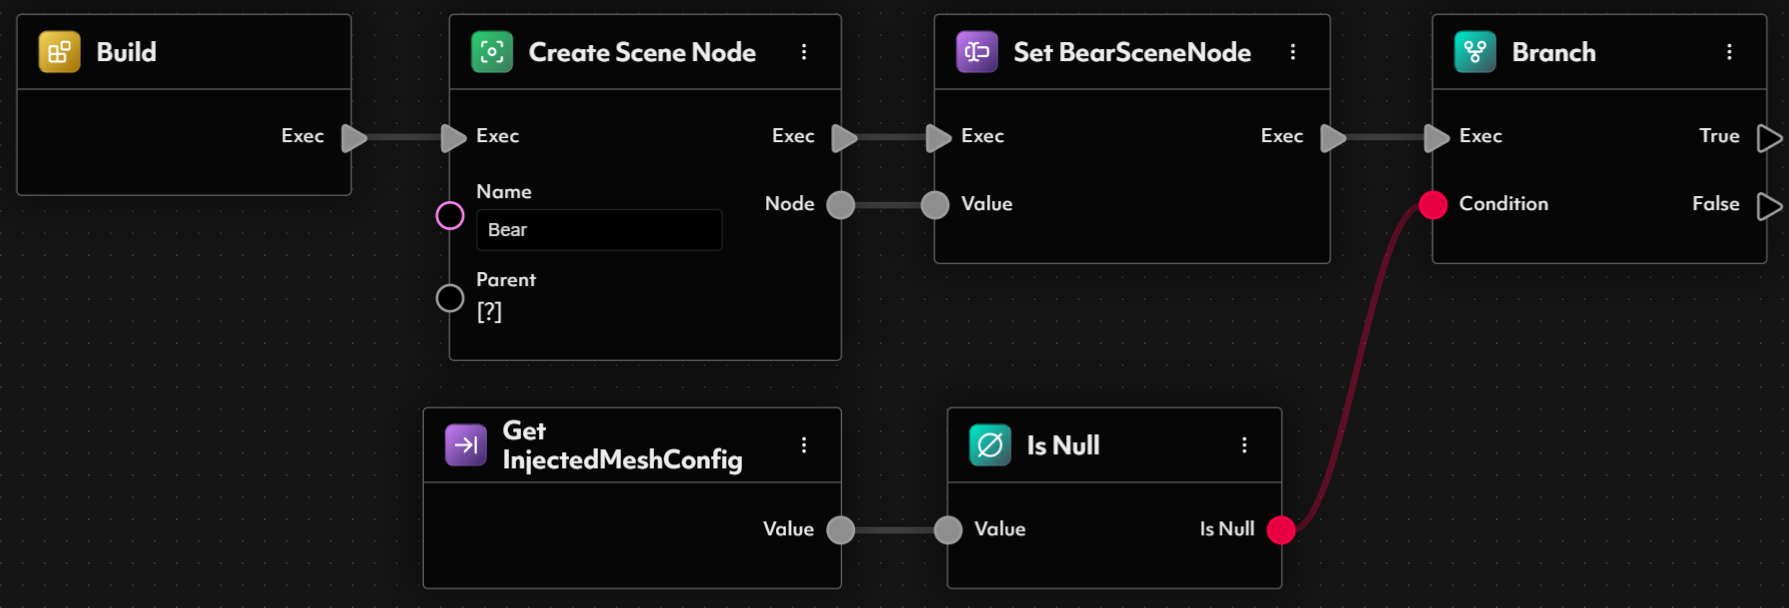
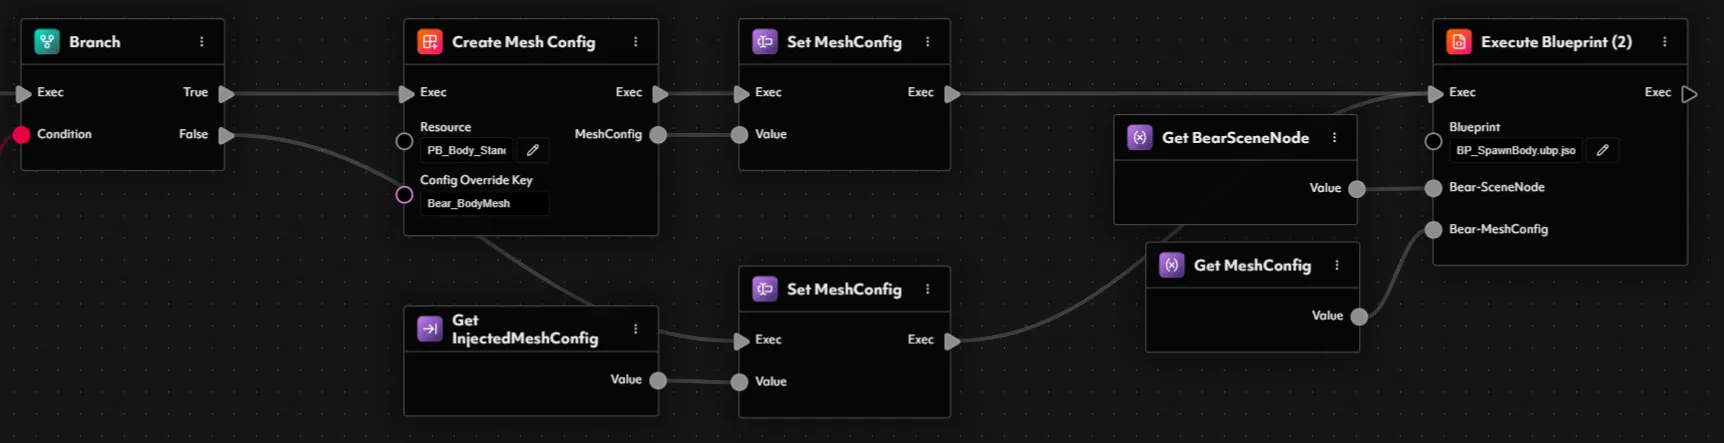
InjectedMeshConfig. Once this input is created, we can incorporate a simple check in our blueprint’s execution flow to see whether the caller has provided a MeshConfig.
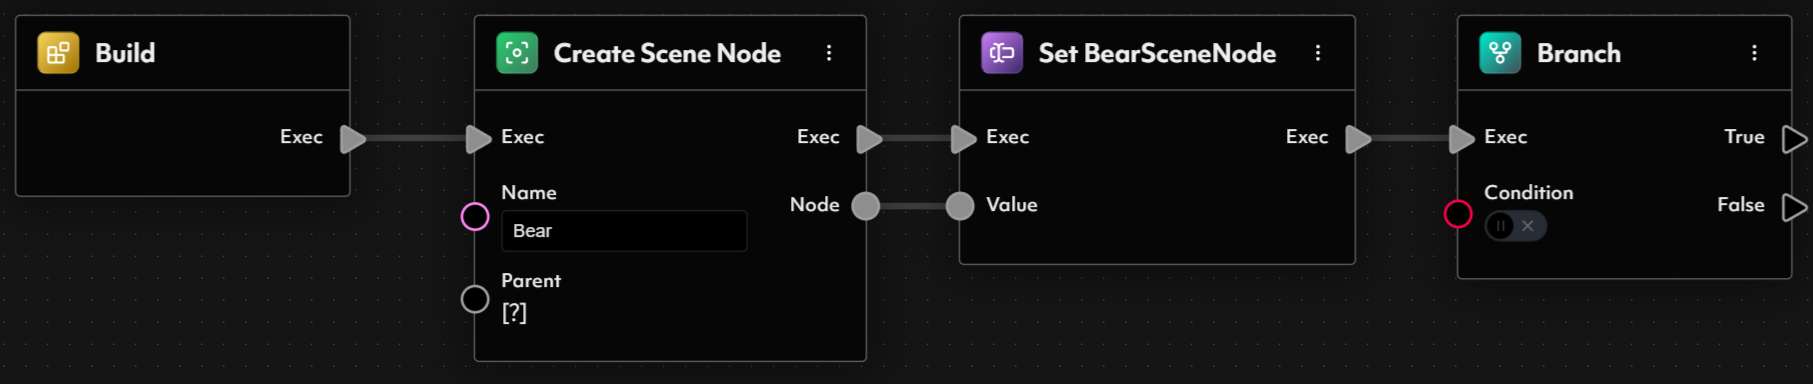
Now that our InjectedMeshConfig input is in place, we need to handle the scenario where it is not provided (i.e., it’s null). To accomplish this, we’ll introduce a Branch node that checks whether a valid MeshConfig has been passed into the blueprint.
First, spawn a Branch node in your graph, connecting it to the next step in your blueprint’s flow. The Branch node evaluates a boolean condition, then routes the execution to True or False pins based on the result.
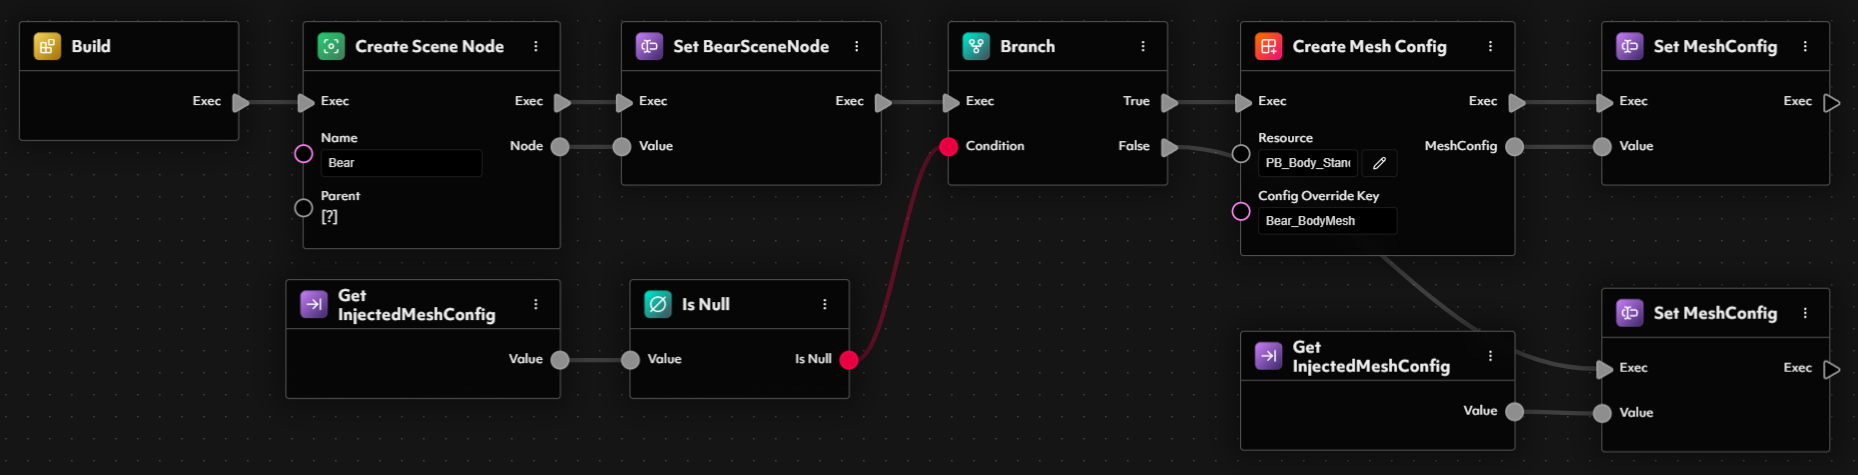
- Locking in the MeshConfig
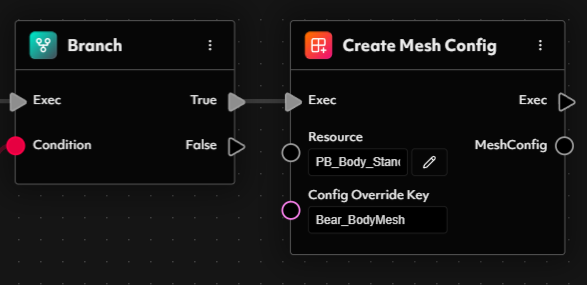
- A Mesh Resource, which serves as the basis for generating the default configuration. We can set this to our
PB_Body_Standardmesh. - A config override key, used to retrieve a specialized configuration in the executing experience. This key plays a crucial role in injecting gameplay-specific functionality into a UBF-spawned character.
Fur Real—Spawning the Body and Applying a Custom Material
- Creating a Body Blueprint
BP_SpawnBody. This blueprint will be responsible for spawning and configuring our bear’s body mesh and applying the stylized fur material that brings it to life.
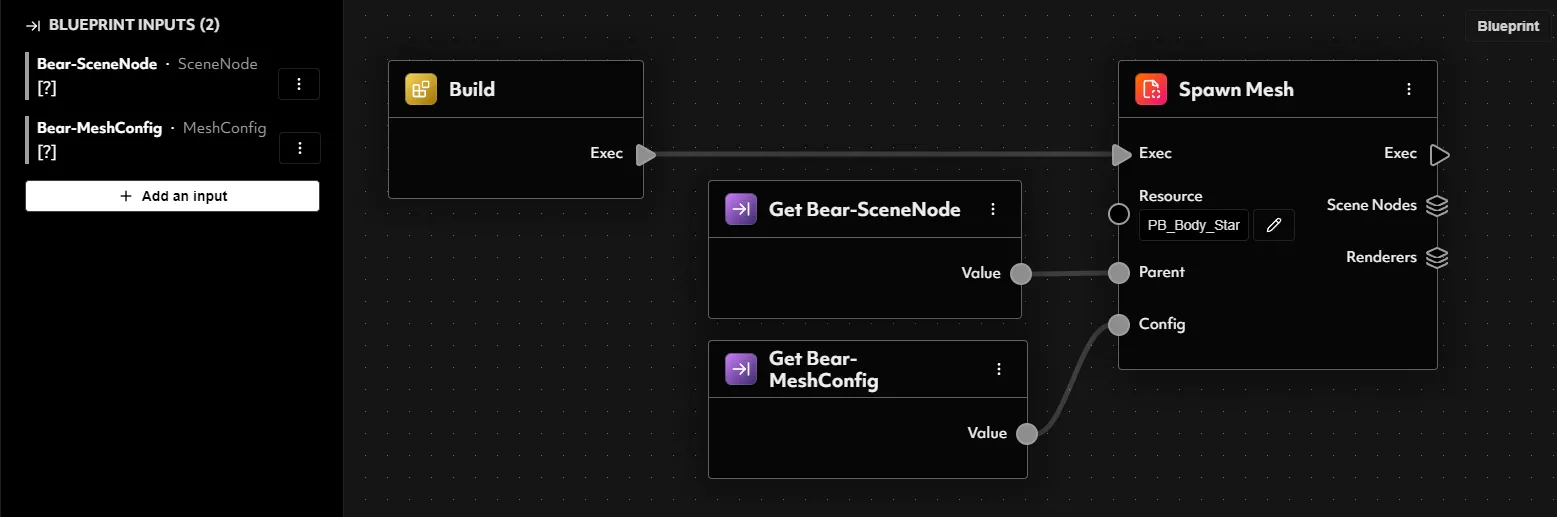
- Spawning the Body Mesh
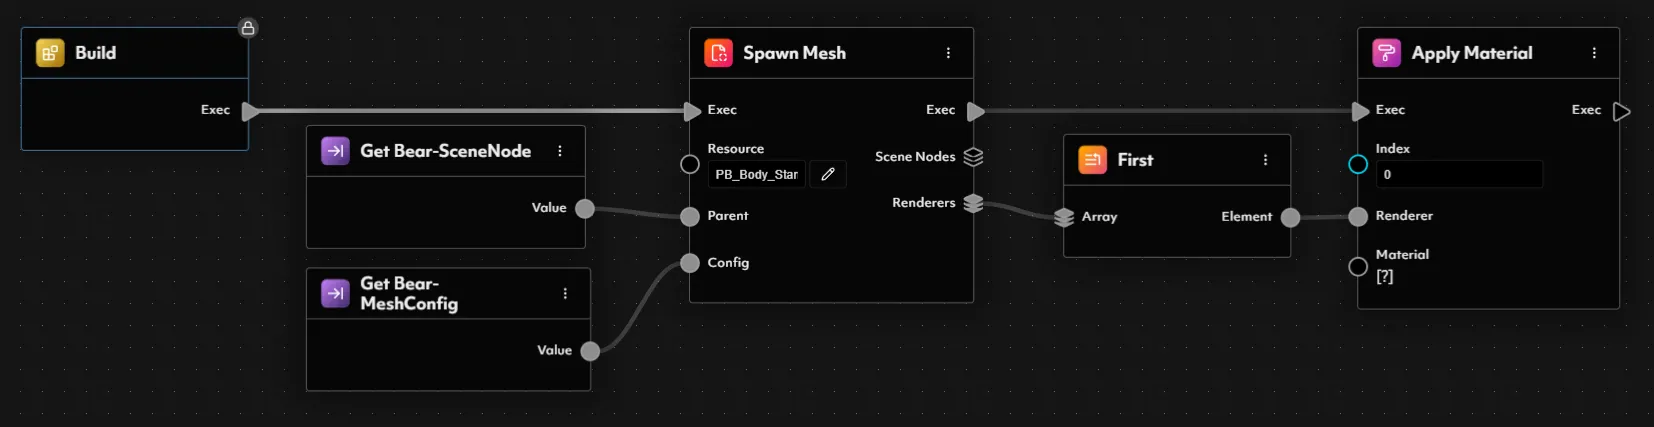
SpawnMesh node to make this happen. This node requires three key inputs: a mesh resource, a parent SceneNode, and a MeshConfig.
For the mesh resource, we’ll directly reference the PB_Body_Standard.glb file, as the bear’s body mesh will remain consistent across all use cases and doesn’t require runtime variability.
Now, regarding the Parent (SceneNode) and Config (MeshConfig) inputs—while we’ve already created these in our main Bear blueprint, they don’t exist within this new BP_SpawnFur blueprint. Since sub-blueprints do not have access to their parent’s internal variables, we need to explicitly define them as inputs to our BP_SpawnBody blueprint so they can be passed down when executed.
To do this, navigate to the Blueprint Inputs panel of BP_SpawnFur and create the following:
- An input of type
SceneNode, namedBear-SceneNode - An input of type
MeshConfig, namedBear-MeshConfig
SpawnMesh node.
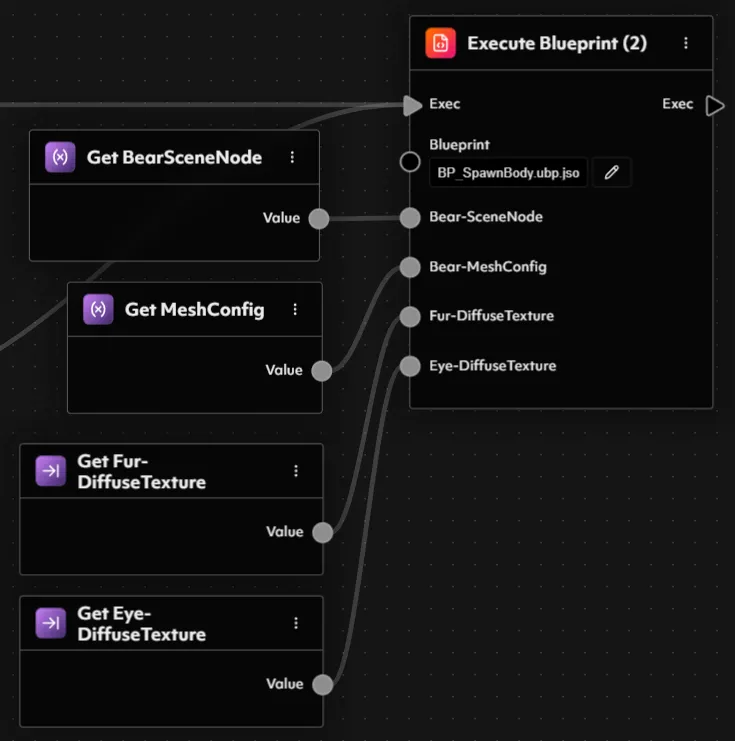
ExecuteBlueprint2 node to run our newly created BP_SpawnBody. Once added, select BP_SpawnBody from the dropdown in the node, and you’ll see the input fields update to match the ones we defined earlier—automatically exposing the Bear-SceneNode and Bear-MeshConfig inputs.
Now wire up the execution flow so that both paths from the earlier Branch node lead into this ExecuteBlueprint2 call. This ensures that regardless of whether we created a new MeshConfig or used an injected one, we always proceed to spawn the bear’s body.
Lastly, connect the two variables we previously created—BearSceneNode and MeshConfig—into the corresponding inputs on the ExecuteBlueprint2 node.
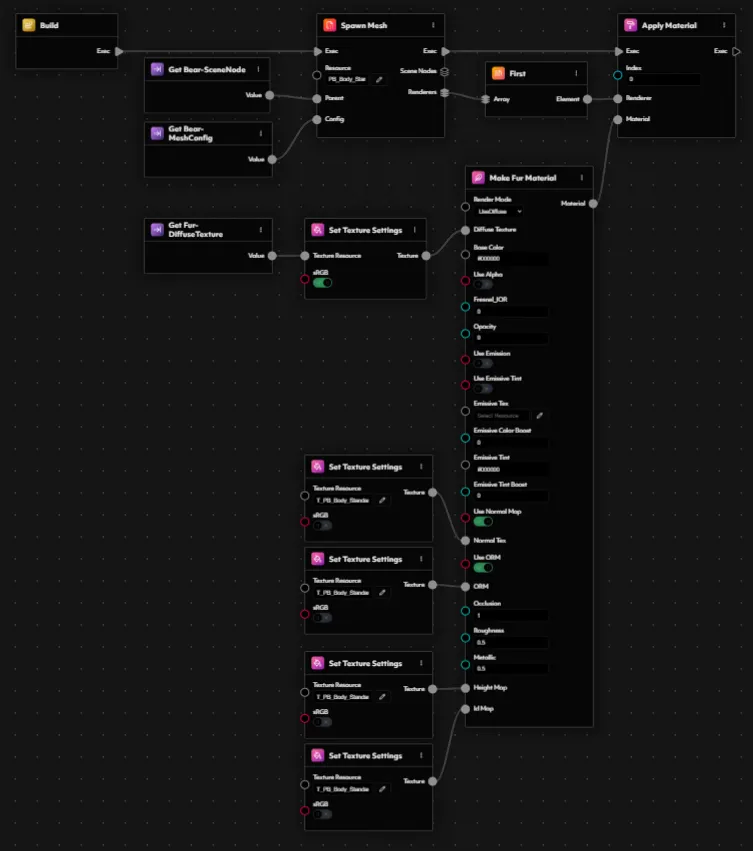
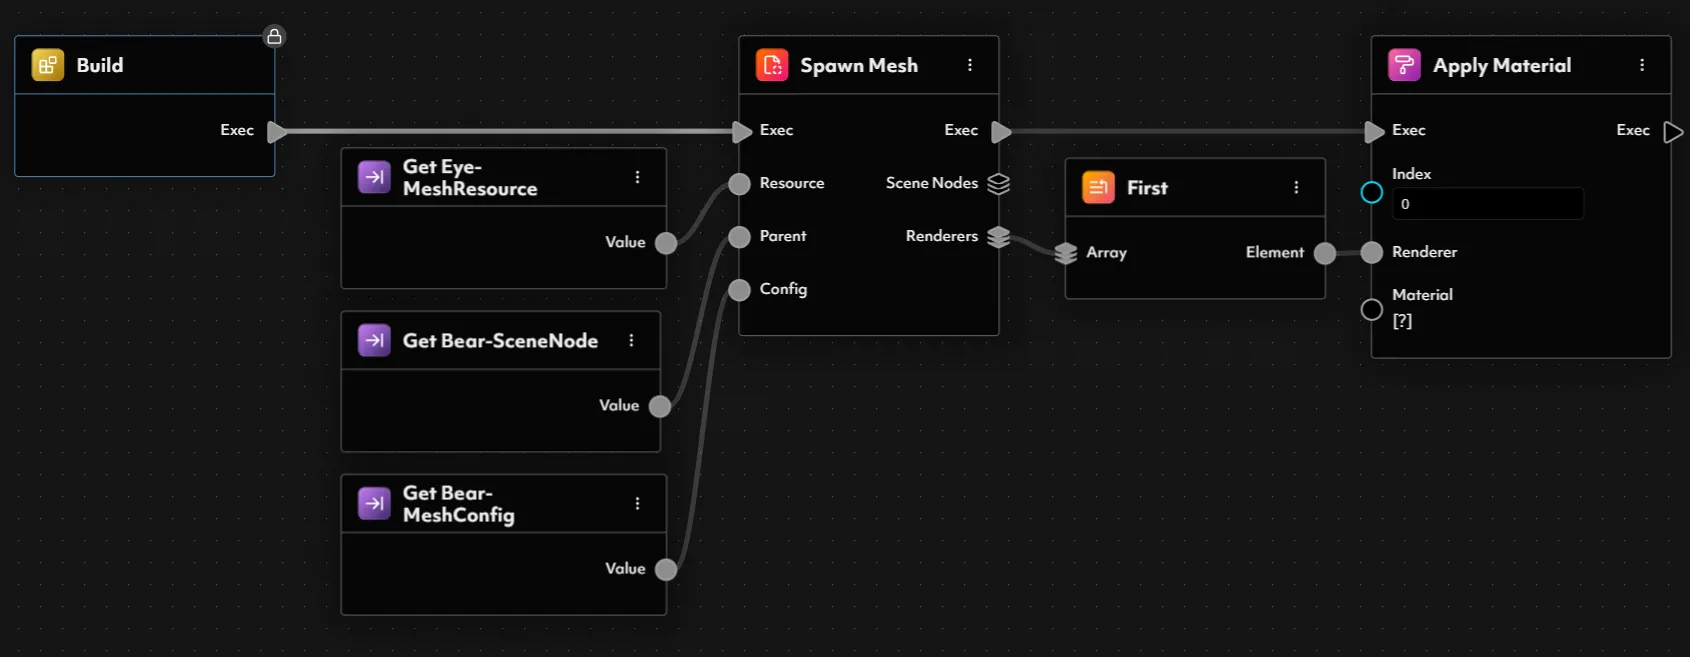
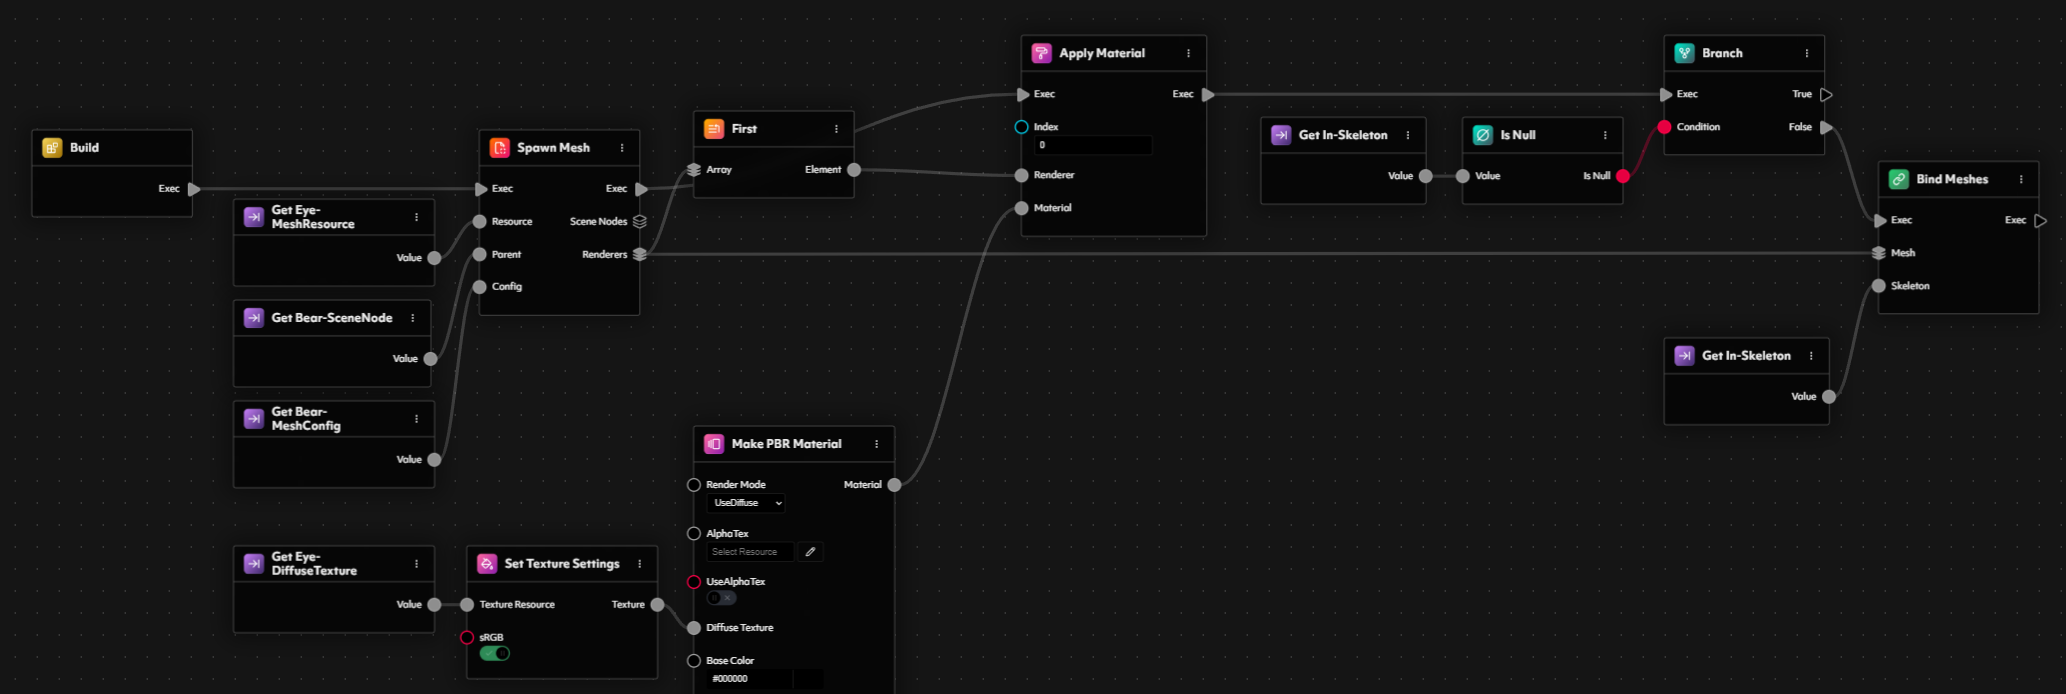
- Applying the Fur Material
First node, allows us to yield the first (and in our case, only) mesh renderer, which we can then feed into the Apply Material node.
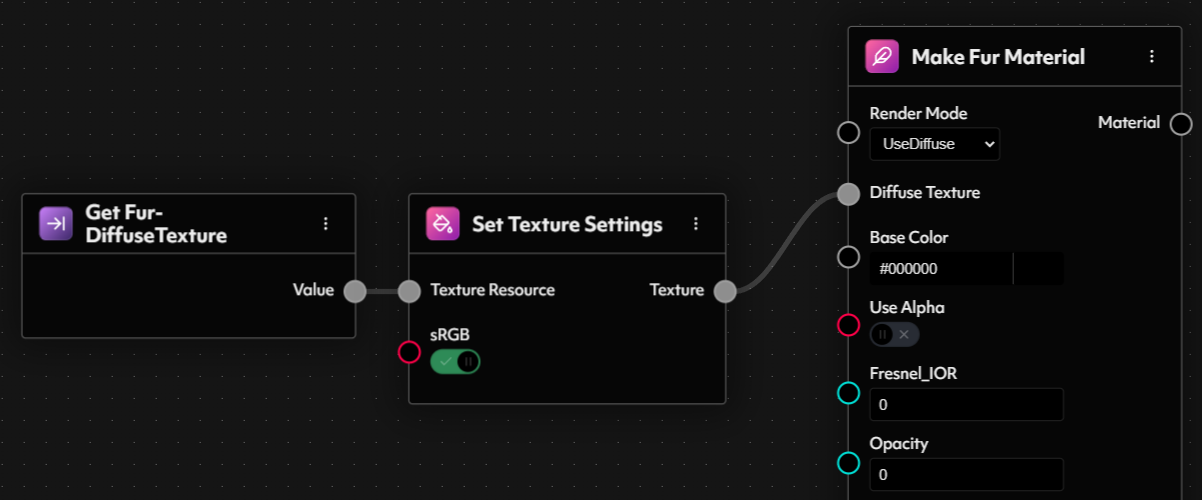
- Set the render mode to UseDiffuse, since we want to apply a diffuse texture to color the fur.
- To keep things flexible and allow customization in future instances, let’s create a Blueprint Input of type
Resource<Texture>for the diffuse texture. Give your new input a name and a default texture—we will use the nameFur-DiffuseTextureand give it the default valueT_PB_Fur_RaspberryRipple_1024.png. - This diffuse / base color texture needs to have sRGB enabled, we can ensure this by leveraging a Set Texture Settings node. This node can take in the input texture, enable sRGB and output the texture with the correct settings applied— then we can connect this into the diffuse texture slot on our material node.
- Next, we’ll add normal, ORM, height, and ID maps to enhance realism. For each of these textures, you can use Set Texture Settings again to ensure sRGB is disabled, then feed them into the corresponding inputs on the MakeFurMaterial node. We do not expect instances to change these textures so we can reference them directly in our set texture settings. Set the different texture inputs as follows:
- Normal Tex:
T_PB_Body_Standard_LOD0_NR_1024 - ORM:
T_PB_Body_Standard_LOD0_ORM_1024 - Height Map:
T_PB_Body_Standard_LOD0_H_1024 - ID Map:
T_PB_Body_Standard_LOD0_CSTM_1024
- Normal Tex:
- Lastly, let’s adjust some of the primitive parameters to finish off the material’s appearance:
- Set Occlusion to 1.
- Set Roughness to 0.5.
- Set Metallic to 0.5.
- Ensure Use Normal Map is enabled.
- Ensure Use ORM is enabled.
BP_SpawnBody blueprint, allowing it to be overridden by a parent blueprint or defaulting to the value we set earlier. However, our main Bear blueprint—the one from which we’ll eventually create instances—doesn’t yet expose this input itself. To ensure we can control the fur texture (and thus the color) from our instances later on, let’s add a matching input to the Bear blueprint with the same default value. Once added, simply pass that input down into the BP_SpawnBody execution, wiring it to the corresponding input to maintain consistency.
Eye on the Prize — Adding Customizable Eyes
- Creating the Spawn Eye Blueprint
BP_SpawnEye. This blueprint will handle all the logic for spawning and configuring a single eye. Then, within our BP_SpawnBody blueprint, we’ll simply call BP_SpawnEye twice—once for each eye—passing in the appropriate mesh and texture for the left and right sides respectively.
Let’s go ahead and create that new blueprint now.
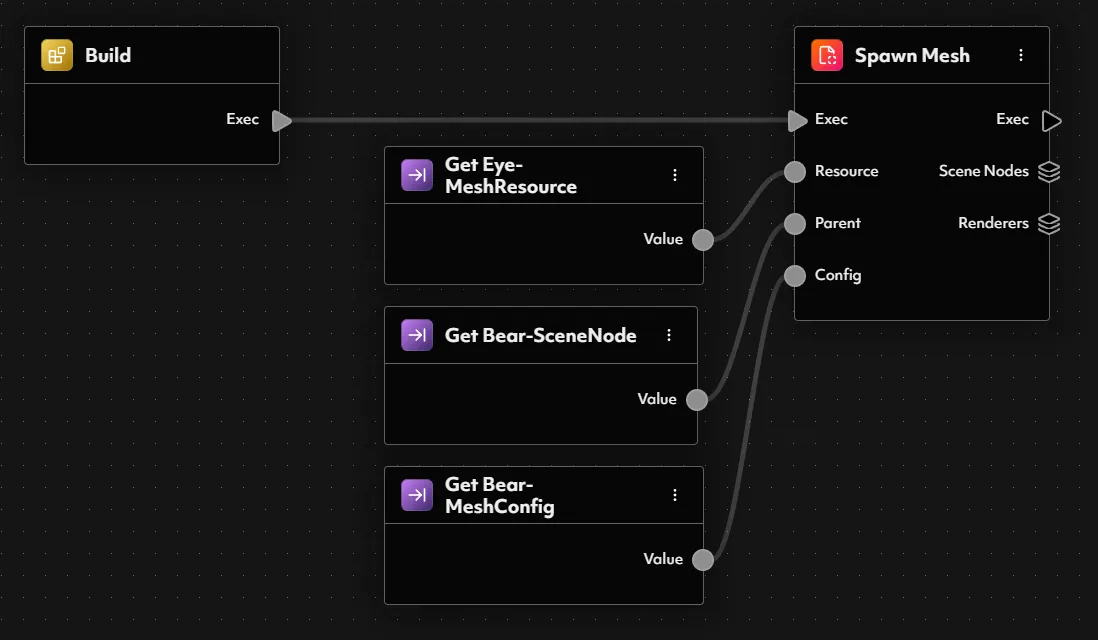
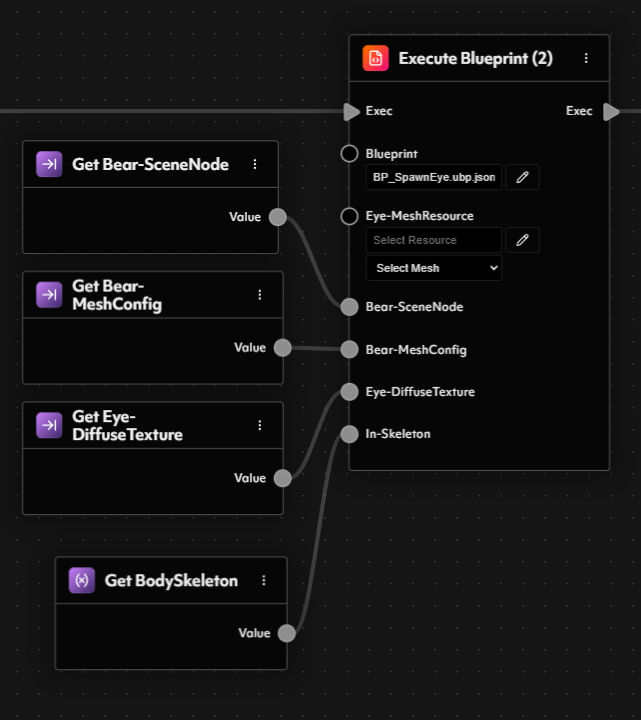
- Spawning the Eye Mesh
SpawnMesh node to bring our eyes into the scene. As a quick refresher, this node requires three key inputs: a Mesh Resource, a Parent SceneNode, and a MeshConfig.
Unlike our previous body blueprint where the mesh resource was fixed, the eye blueprint will need all three values to be passed in from the outside. This ensures it remains flexible and reusable—allowing us to use the same blueprint for both the left and right eye, with different inputs for each.
Let’s go ahead and define the inputs in our blueprint now:
- A
Resource<Mesh>input with nameEye-MeshResource - A
SceneNodeinput with nameBear-SceneNode - A
MeshConfiginput with nameBear-MeshConfig
SpawnMesh node.
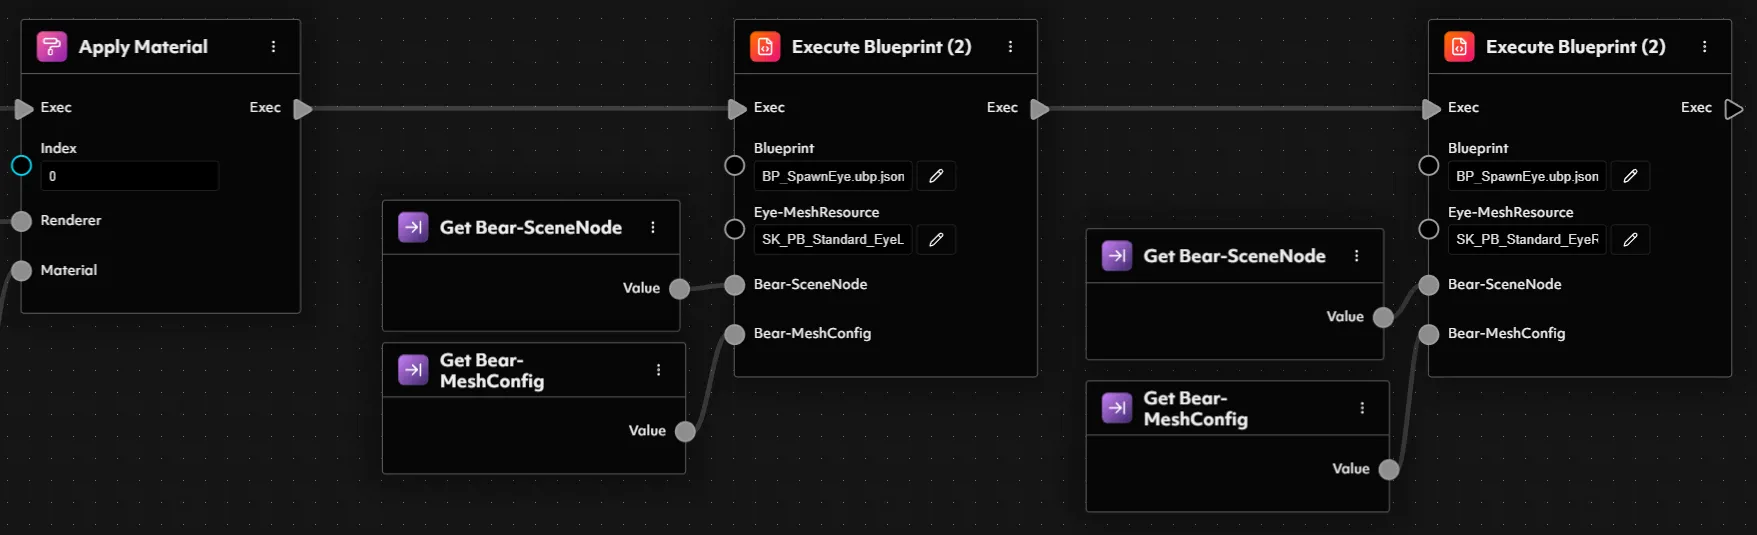
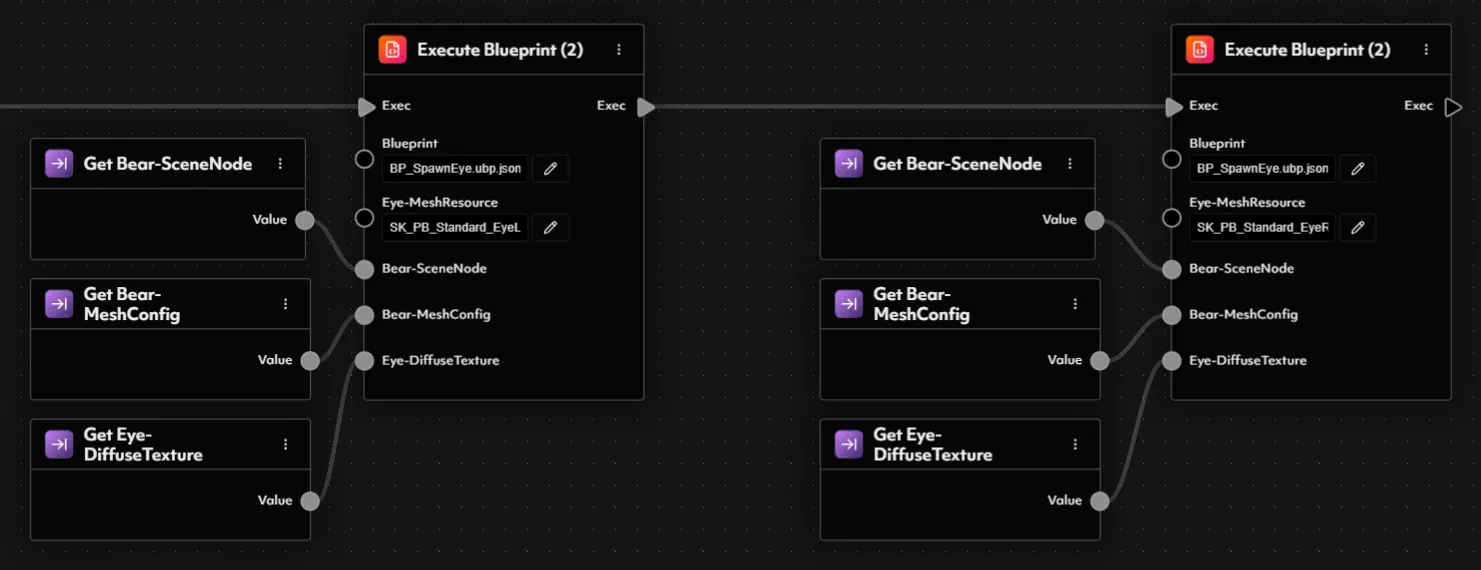
BP_SpawnBody blueprint, we can now follow on from spawning the bear’s body and applying its fur by executing our newly created BP_SpawnEye blueprint—twice, once for each eye. Just like before, we’ll use the ExecuteBlueprint2 node to call the eye blueprint and pass in the necessary inputs.
For both calls, we’ll connect the existing Bear-SceneNode and Bear-MeshConfig variables to their respective inputs on the node. The only thing that changes between the two executions is the mesh resource we provide to the EyeResource input.
- For the left eye, use the resource:
SK_PB_Standard_EyeLeft_LOD0 - For the right eye, use the resource:
SK_PB_Standard_EyeRight_LOD0
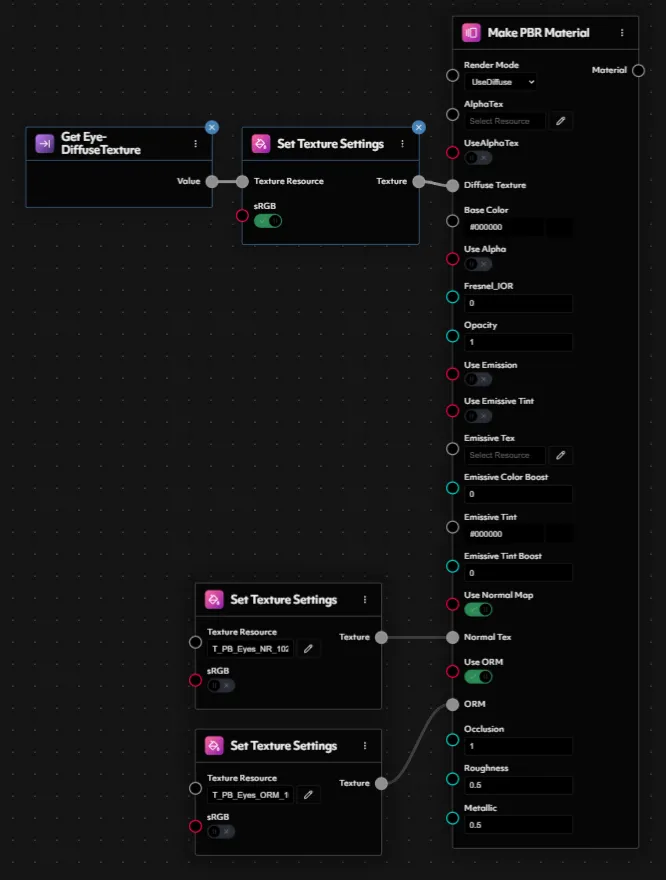
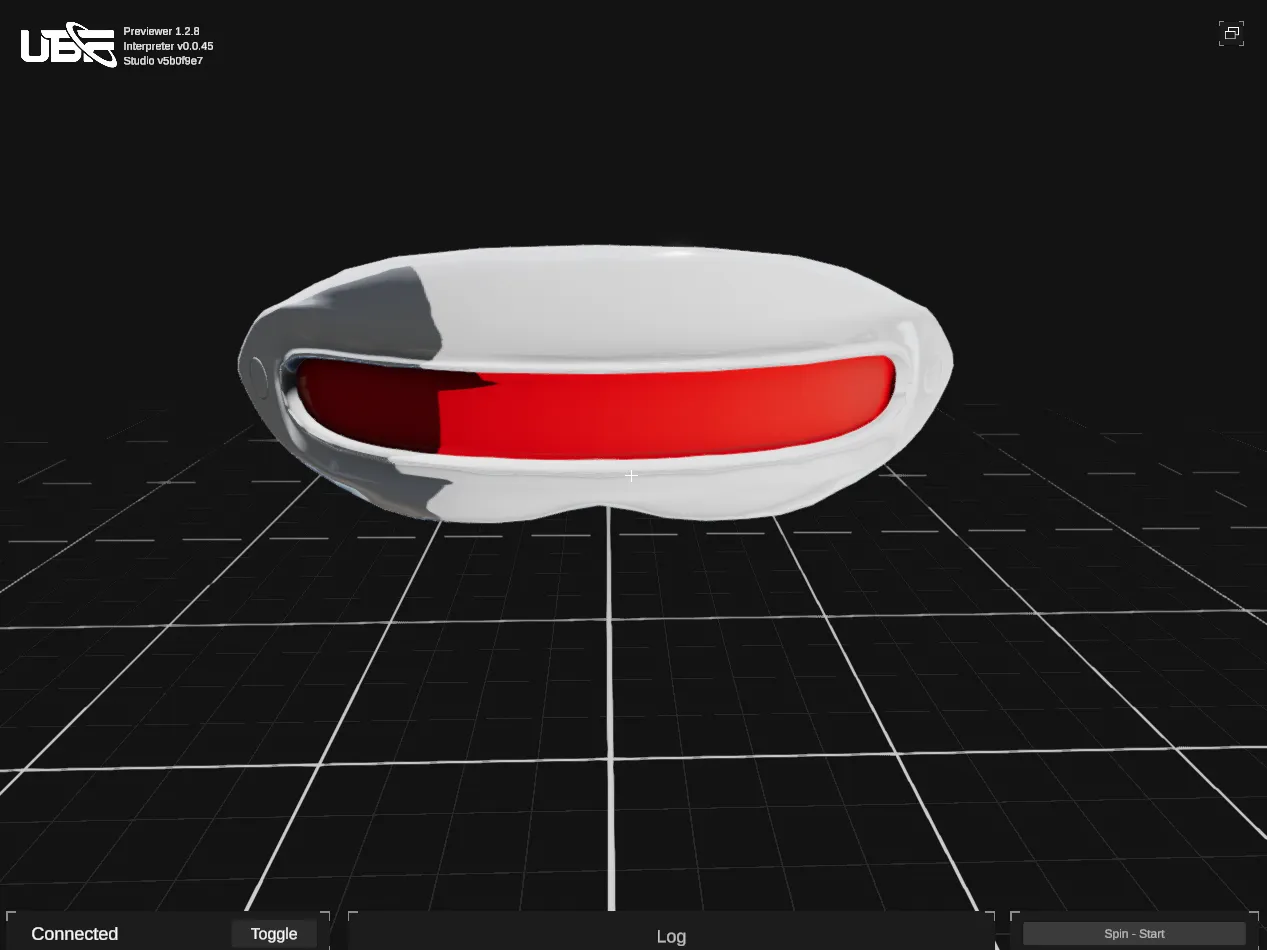
- Applying the Eye Material
BP_SpawnEye blueprint, let’s continue from where we left off after spawning the mesh by applying a material—just as we usually do—using the Apply Material node.
As always, we can leave the Index input of the Apply Material node at 0 (targeting the first material slot). For the Renderer input, we’ll use the first (and only) renderer returned from the SpawnMesh outputs. To retrieve it, we can use the First node from the array.
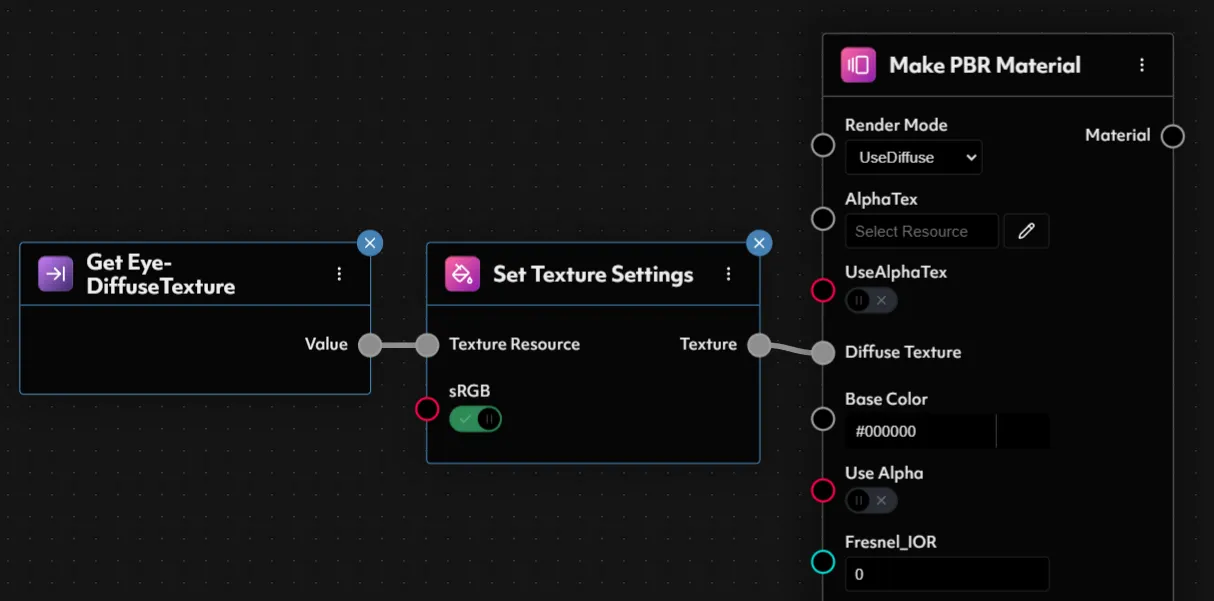
true, then connect the texture output to the Diffuse Texture input of the Make PBR Material node.
Now for the actual texture resource—we want to make this customizable, so let’s create an input in our graph of type Resource<Texture> and name it Eye-DiffuseTexture. We can give this a default value for testing, feel free to use any of the included eye BC textures:
T_PB_Eyes_Green_BC_1024T_PB_Eyes_Purple_BC_1024T_PB_Eyes_Red_BC_1024
false this time. Since these textures won’t change, we can directly reference them. The textures to use are included in your resources and map to:
- Normal:
T_PB_Eyes_NR_1024 - ORM:
T_PB_Eyes_ORM_16
- RenderMode:
UseDiffuse - Opacity:
1 - Occlusion:
1 - Roughness:
0.5 - Metallic:
0.5 - Use Normal Map:
true - Use ORM:
true
- Making the Eyes Customizable
Eye-DiffuseTexture is an input to the BP_SpawnEye blueprint, which means it can be set within the BP_SpawnBody blueprint that calls it. However, to make customization even more accessible, we want to expose this input at the top level in our BP_Bear blueprint.
To do this, we’ll add a new input to the BP_SpawnBody blueprint and link it to the existing input when executing BP_SpawnEye.
BP_Bear blueprint—adding a new input and connecting it to the ExecuteBlueprint2 node for BP_SpawnBody.
All Eyes on Me — Binding the Eyes to the Body
With the eye meshes now spawned and in place, the next step is to ensure they remain properly aligned and animated with the character’s body. Without this connection, the eyes would stay static whenever the character moves. To handle this, we need to bind the eye meshes to the body’s skeleton—but only if a valid reference to that skeleton is available. Start by adding a new input to your blueprint, naming it something likeIn-BodySkeleton, and setting its type to MeshRenderer.
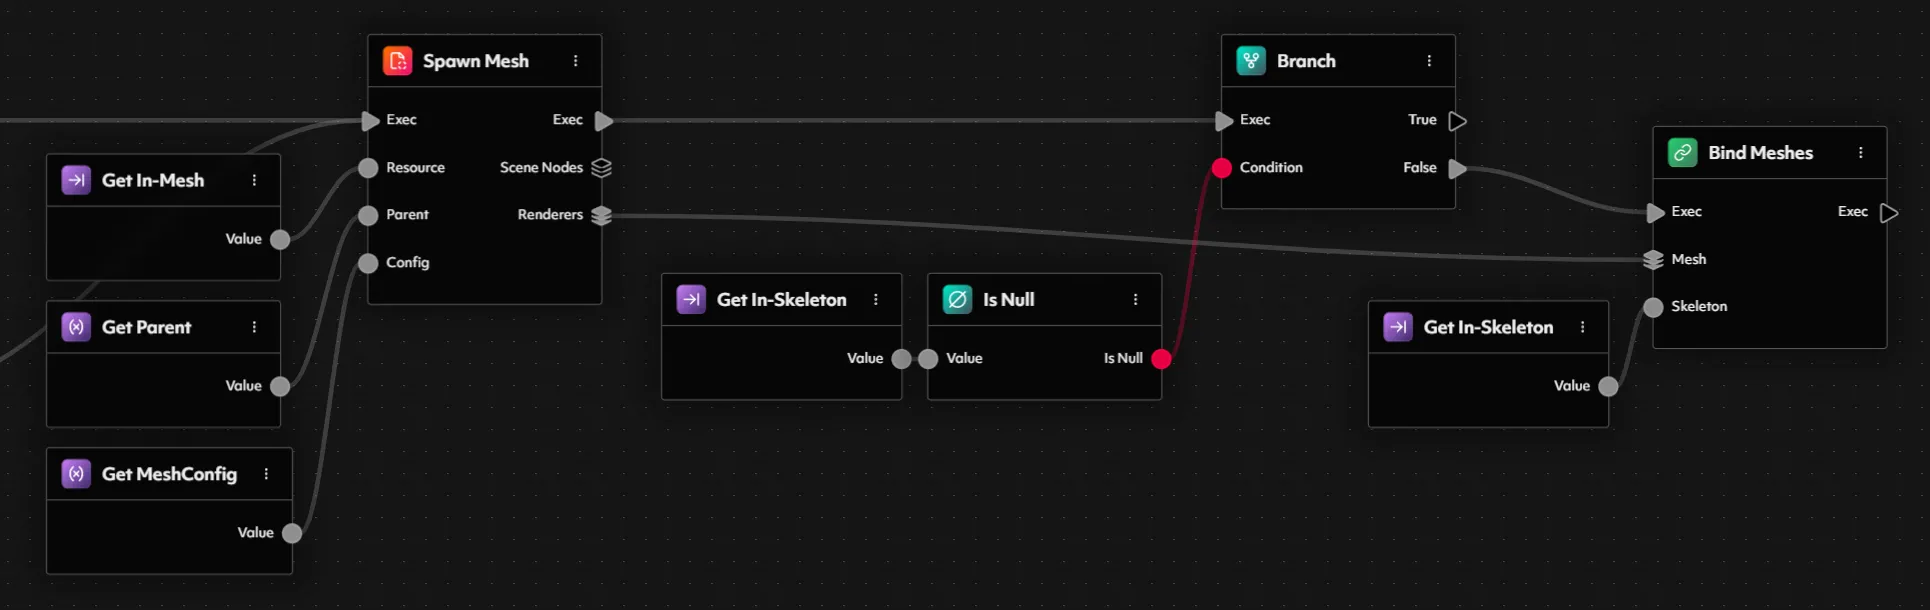
After spawning the eye mesh and applying a material, insert a Branch node. Use the getter for your In-BodySkeleton input and connect it to an IsNull node. The output of that node will control the condition of your branch, determining whether or not we proceed with binding.
Now, on the FALSE path (meaning the skeleton is valid), drop in a Bind Meshes node. This is what links the eyes to the body’s rig so they animate together naturally.
The Bind Meshes node expects two inputs:
- Meshes: An array of mesh renderers to bind. You’ll connect this directly from the output of the node that spawns your eye meshes.
- Skeleton: This is the source mesh renderer—the rig—that the other meshes will follow. Simply drag the ‘In-Skeleton’ blueprint input into this input.
BP_SpawnBody blueprint. For now, the Spawn Eye blueprint setup is complete.
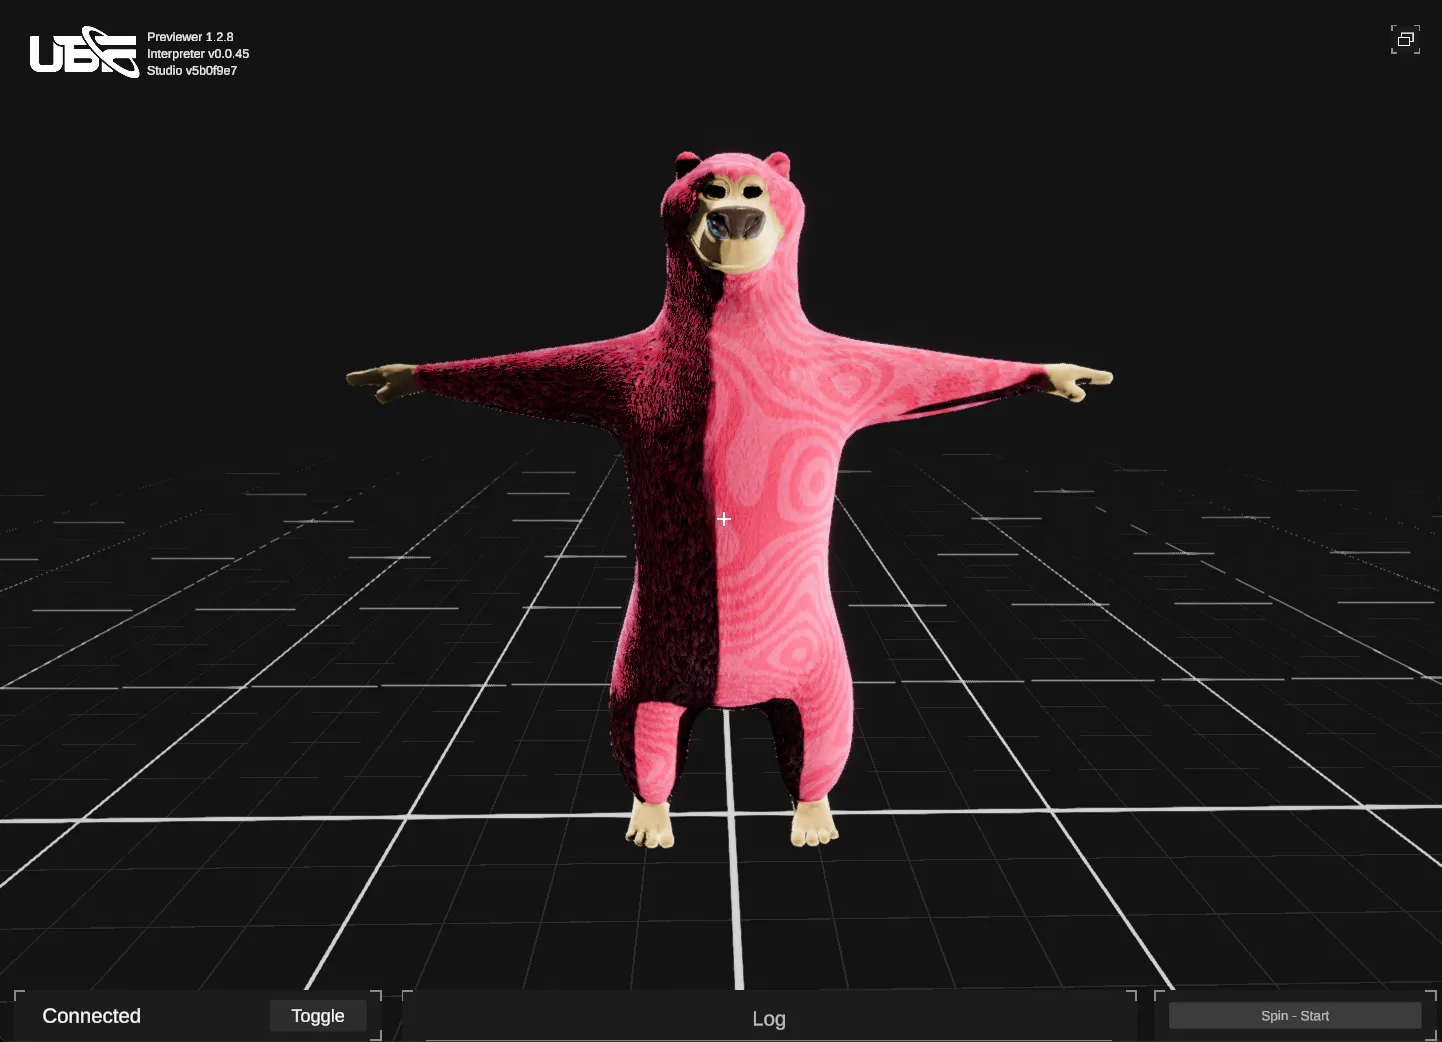
Bear-y Unique — Crafting Custom Bear Instances
With that, our Party Bear’s base blueprint is complete, and we now have the ability to render a Party Bear. This base bear blueprint acts as the template or foundational recipe—it defines how to render any bear, while allowing us to configure the colors of the eyes and fur through its inputs. Essentially, it’s like having a flexible character template that can be customized at runtime. Instead of duplicating this entire blueprint for every variation we might want (which would be cumbersome and prone to errors), we can leverage blueprint instances. Think of a blueprint instance as a customized version of the base blueprint—a way to define specific configurations without modifying the original. For example, one instance might render a bear with blue fur and green eyes, while another could render a bear with red fur and yellow eyes—all while keeping the underlying logic of the base blueprint intact. This approach makes it incredibly efficient and easy to manage multiple variations without duplicating code. To create some instances, navigate to our main BP_Bear blueprint and, in the inspector panel on the left, select the Instances menu. From here, select Create Blueprint Instance. This will immediately generate an instance of the blueprint, allowing you to customize any of the exposed inputs. In our case, these inputs are the Fur and Eye Diffuse textures. Change these values to whatever you like, and then save your instance in the Bear folder with a suitable name—we’ll use BPI_SimpleBear (using BPI to denote a blueprint instance).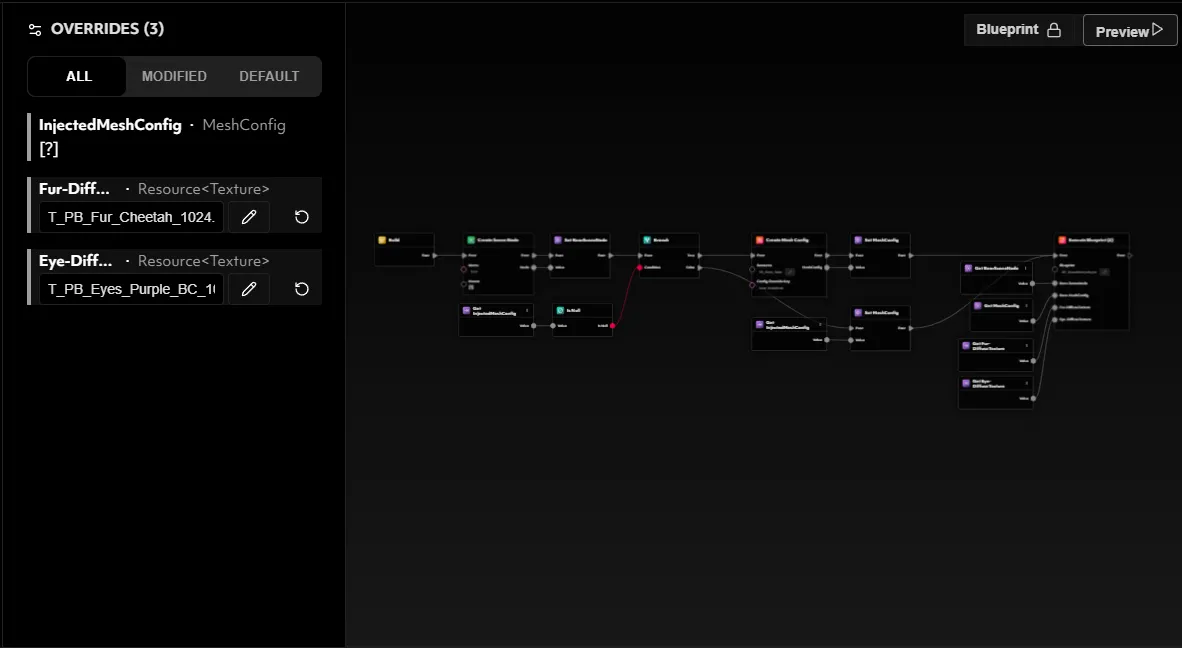

Thread by Thread — Building Our Accessory Arsenal
Now that our Party Bear is fully formed and sporting a great look, it’s time to take his style to the next level with clothing and accessories! In this section, we’ll focus on creating and managing these accessory blueprints—ranging from hats to jackets, and eyewear.Creating the Base Accessory Blueprint
To maintain the same modular philosophy we used for the bear’s body and eyes, we’ll start by creating a base accessory blueprint that can handle spawning any generic accessory. Each unique hat, jacket, or pair of glasses will then become an instance of this blueprint—much like the approach we used for the bear. You will notice some similarities to sections of the main Bear blueprint we set up initially, the reason for this is that it allows us to set up our accessories in such a way that they remain fully independent, allowing them to be viewed and configured on their own, while also making it easy to attach them to a parent (like our Party Bear).- Setting Up the Parent Scene Node
BP_Accessory. This blueprint will resemble much of the logic from the main bear blueprint but focused on accessories instead of a full character.
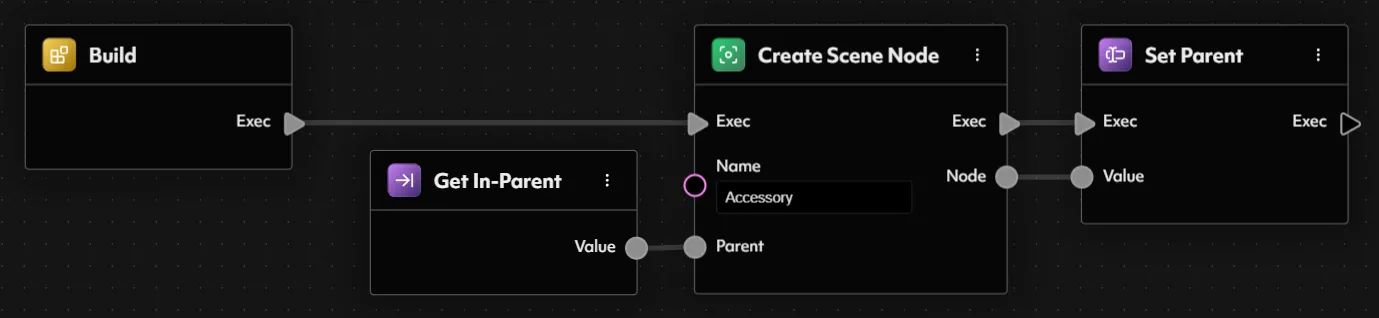
In the Blueprint Inputs panel, add a new input of type SceneNode, naming it something like In-Parent. This input will determine where in the scene the accessory is attached; if a valid scene node is passed in, the accessory will become a child of that node. If not, it remains independent.
Inside the blueprint, place a CreateSceneNode node. Drag In-Parent from your variables into the graph and connect it to the Parent pin of CreateSceneNode. This ensures that, if provided, the accessory’s newly created scene node will be a child of the passed-in parent. For the Name, feel free to use something like “Accessory”.
Next, add a private variable of type SceneNode—call it Parent to differentiate it from In-Parent. Spawn a Set Parent node, linking it to the output of CreateSceneNode. This variable will be used later to anchor any meshes we spawn.
- Handling the MeshConfig
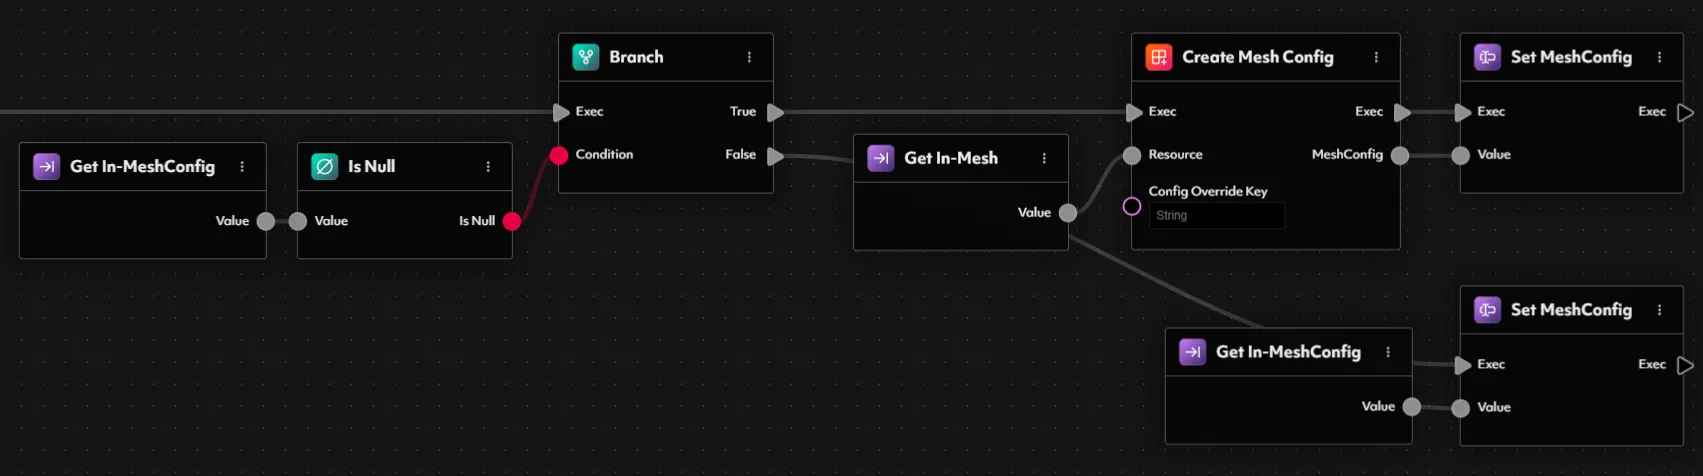
MeshConfig—we’ll call it In-MeshConfig. This will allow the accessory to either use an existing config provided by a parent blueprint or create its own if nothing is passed.
Drag In-MeshConfig into the graph and feed it into an IsNull node, then add a Branch node. Wire the boolean output of IsNull to the Condition input of the Branch, splitting the logic based on whether a valid MeshConfig has been provided.
With this branch node in place we can split the execution into two flows:
- True Path (Null): If
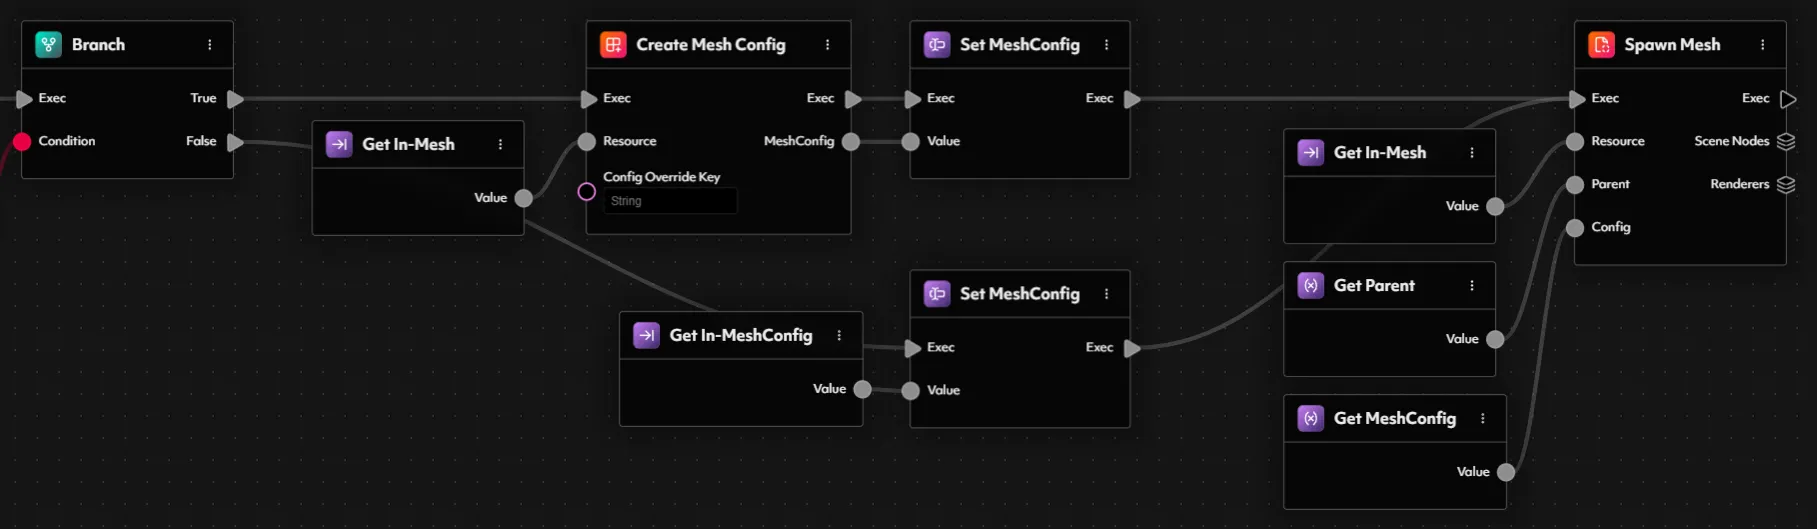
In-MeshConfigis null, we’ll create a new MeshConfig. First, add an input of typeResource<Mesh>—call itIn-Mesh—so that we can specify which mesh this accessory will use. Next, spawn a CreateMeshConfig node and connectIn-Meshto its Resource pin. - False Path (Not Null): If
In-MeshConfigis valid, we’ll just reuse it.
MeshConfig—let’s call it MeshConfig—and place Set MeshConfig nodes in each path of the Branch. In the true path, set it to the output of CreateMeshConfig, and in the false path, set it to In-MeshConfig. This way, the rest of the blueprint can access a “final” MeshConfig variable, regardless of whether we created it or inherited it.
- Spawning the Mesh(es)
- For the Resource input, connect your
In-Meshinput. - For the Parent input, hook up the
Parentvariable, which holds the scene node we created earlier. - For the Config input, connect the
MeshConfigvariable, which now holds either the inherited or newly created configuration.
- Binding the Mesh(es)
In-Skeleton of type MeshRenderer. This will be the rig that the accessory meshes follow.
After spawning the accessory meshes, insert a Branch node to check whether a valid skeleton has been passed in. You can do this by using the getter for In-Skeleton, hooking it up to an IsNull node, and feeding that result into the condition input of the branch.
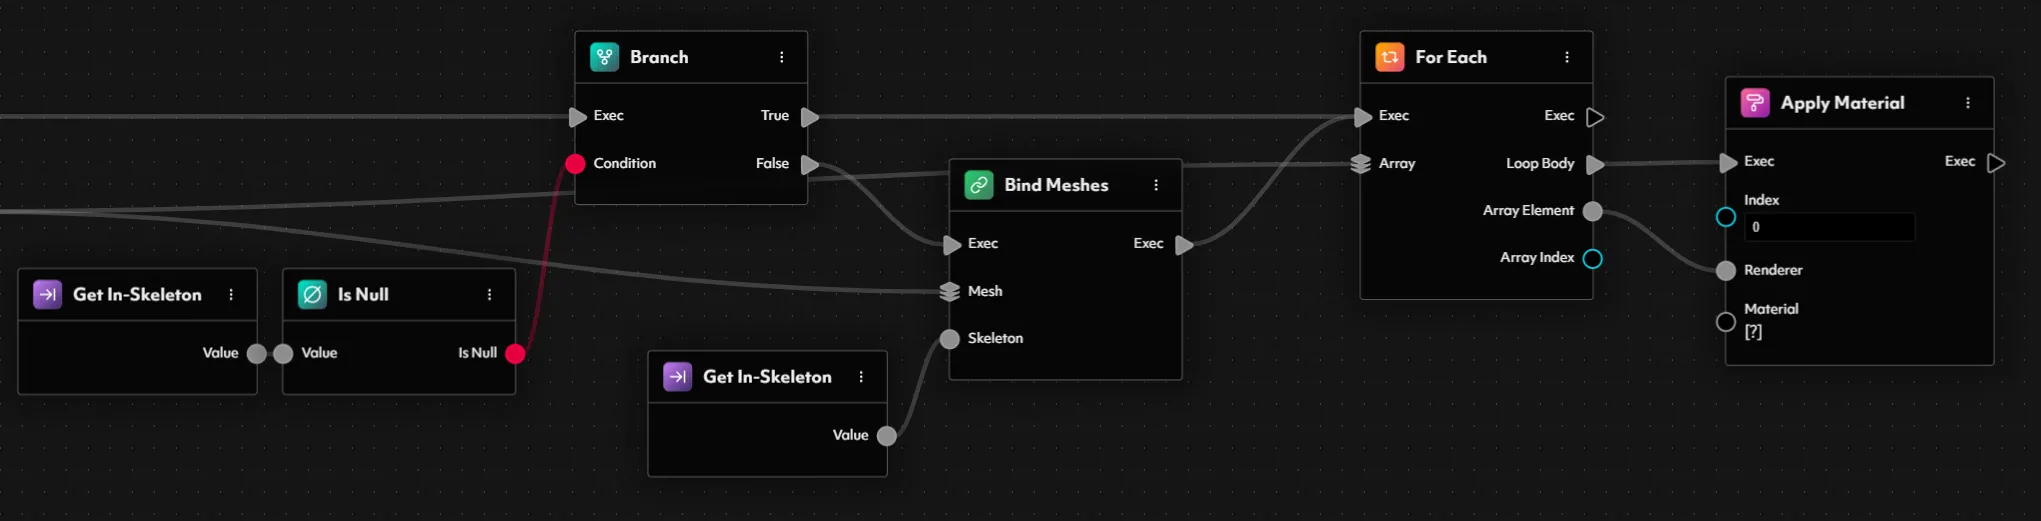
On the FALSE path (meaning the skeleton is valid) drop in a Bind Meshes node to connect the accessory meshes to the skeleton. Just like before, this node needs two inputs:
- Meshes: Connect this to the output from the accessory spawning node.
- Skeleton: Use the In-Skeleton blueprint input here.
- Applying Material(s)
Renderers output from the SpawnMesh node into its Array input. You’ll notice that the Array Element type automatically updates to match the type of the input array—in this case, MeshRenderer. This loop will give us access to each individual mesh renderer, one at a time.
The ForEach node provides two execution outputs:
- Loop Body: Executes once for each element in the array.
- Exec: Executes once after the loop has finished iterating through all elements.
Array Element pin from the ForEach loop—this ensures that each mesh renderer receives the material application.
- Creating a Dynamic PBR Material
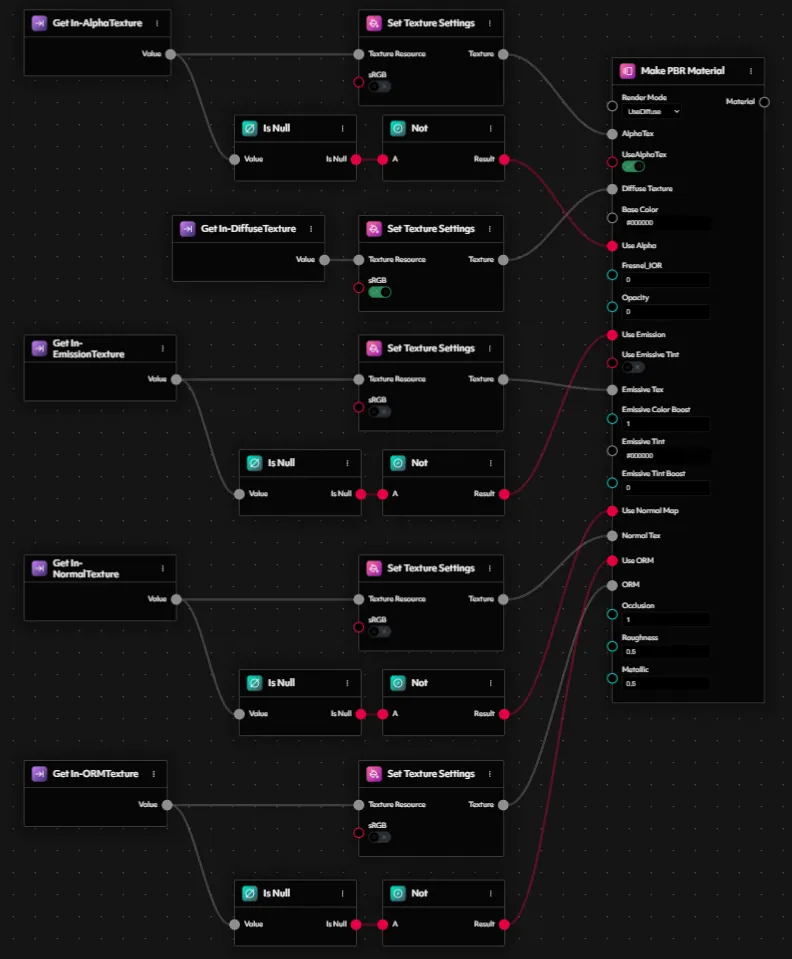
- Spawn a Make PBR Material node into your blueprint.
-
Render Mode
Set the Render Mode to
UseDiffuse, as we’ll always want to use a diffuse texture for visual definition. -
Alpha Texture
Create an input into the blueprint named
In-AlphaTextureof typeResource<Texture>. Route this through a SetTextureSettings node to disable sRGB, and connect the output into theAlphaTexinput on the PBR material node. Then, enableUseAlphaTexby setting that checkbox totrue. -
Diffuse Texture
Repeat the process for the diffuse texture:
- Create an input named
In-DiffuseTextureof typeResource<Texture>. - Pass it through a SetTextureSettings node, this time with sRGB enabled.
- Connect it to the
DiffuseTexinput of the PBR material.
- Create an input named
-
Base Color
Leave the
BaseColorinput at its default. -
Use Alpha
The
UseAlphainput should only be enabled if an alpha texture has actually been provided. To achieve this:- Drag a pin from the previously created
Get In-AlphaTexturenode. - Pipe it into an IsNull node, then invert the result using a Not node.
- Connect the result to the
UseAlphainput.
- Drag a pin from the previously created
-
Fresnel IOR
Set this to
0. -
Opacity
Set this to
1for full visibility. -
Emission
To support emissive elements:
- Create an input called
In-EmissionTextureof typeResource<Texture>. - Use a SetTextureSettings node to disable sRGB.
- Connect the result to the
EmissiveTexinput. - As before, check if the texture is null, use a Not node, and connect the result to the
UseEmissionboolean input. - Set
EmissionColorBoostandEmissionTintBoostto1. - Leave the
UseEmissionTintandEmissionTintColorsettings at their defaults.
- Create an input called
- Normal Map and ORM Textures
- Create inputs
In-NormalTextureandIn-ORMTextureof typeResource<Texture>. - Pipe each through SetTextureSettings with sRGB disabled.
- Use IsNull → Not logic to control
UseNormalMapandUseORM, respectively. - Connect the textures and booleans to their respective PBR material inputs.
- Final Float Properties
- Set
Occlusionto1 - Set
Roughnessto0.5 - Set
Metallicto0.5
Apply Material node you created earlier in the ForEach loop.
And with that, your base accessory blueprint is complete—flexible, modular, and fully customizable from the outside! All that is left is to start creating some accessories!
Creating the Accessory Instances using Blueprint Instances
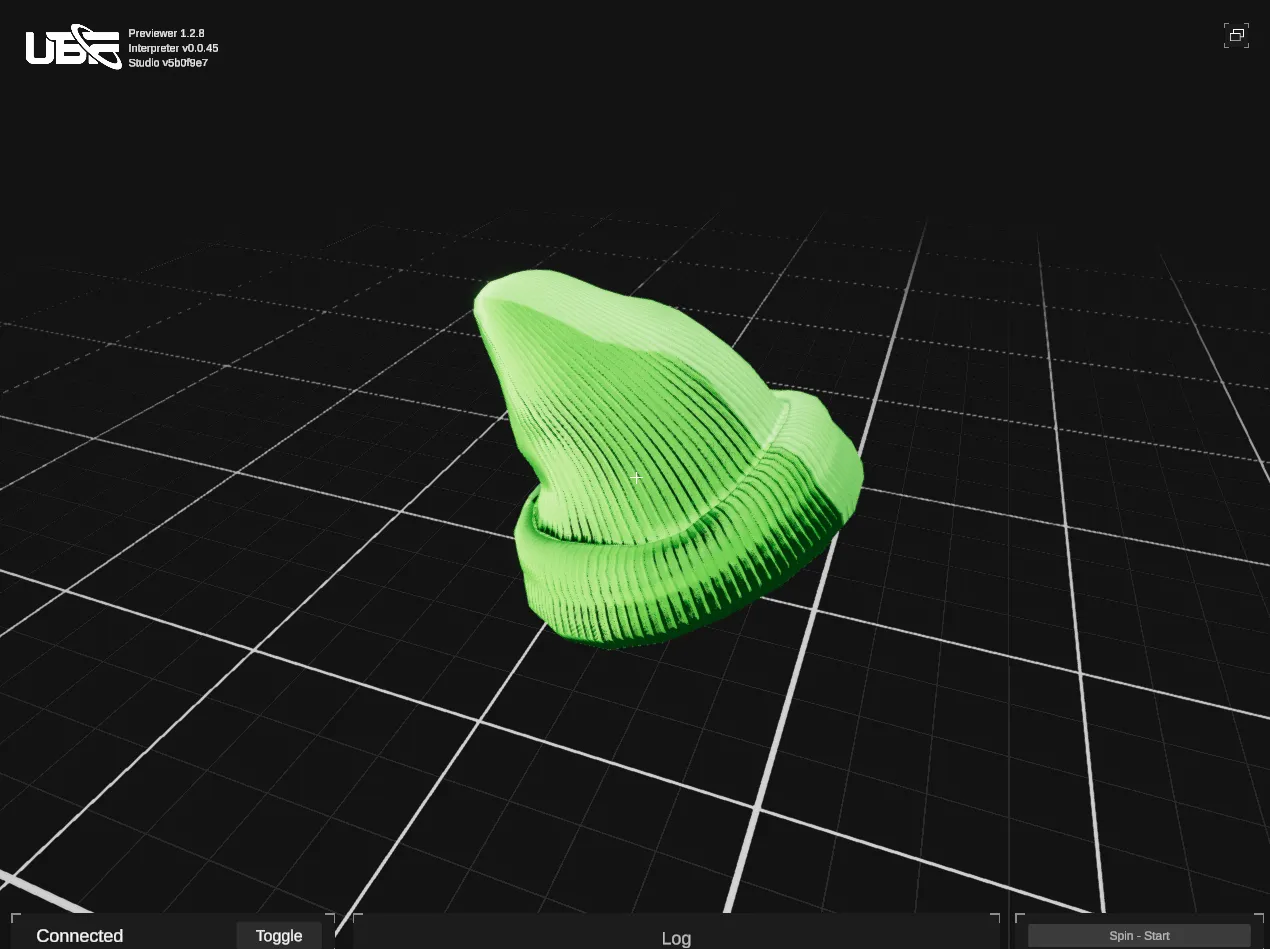
With our base accessory blueprint now complete, we’re ready to start bringing some actual accessories to life! In this step, we’ll create individual Blueprint Instances for each specific accessory—starting with a cozy beanie to keep our Party Bear warm.- Beanie – Cozy, Warm, and Stylish
Accessories folder in the Project Explorer, right-click and select New Blueprint Instance. Name this instance something descriptive; we’ll go with BPI_Accessory_Head_Beanie. You’ll be prompted to select a base blueprint—choose the BP_Accessory blueprint we just finished setting up.
Once your instance is created, head over to the Inspector panel on the left side and open the Overrides section. This is where you’ll find all the configurable inputs that we exposed in the base accessory blueprint. Let’s go ahead and provide the correct values for our beanie accessory:
In-Mesh:PB_Head_Beanie.glbIn-DiffuseTexture:T_PB_Beanie_Head_BC_1024.pngIn-NormalTexture:T_PB_Beanie_Head_NR_1024.pngIn-ORMTexture:T_PB_Beanie_Head_ORM_64.png
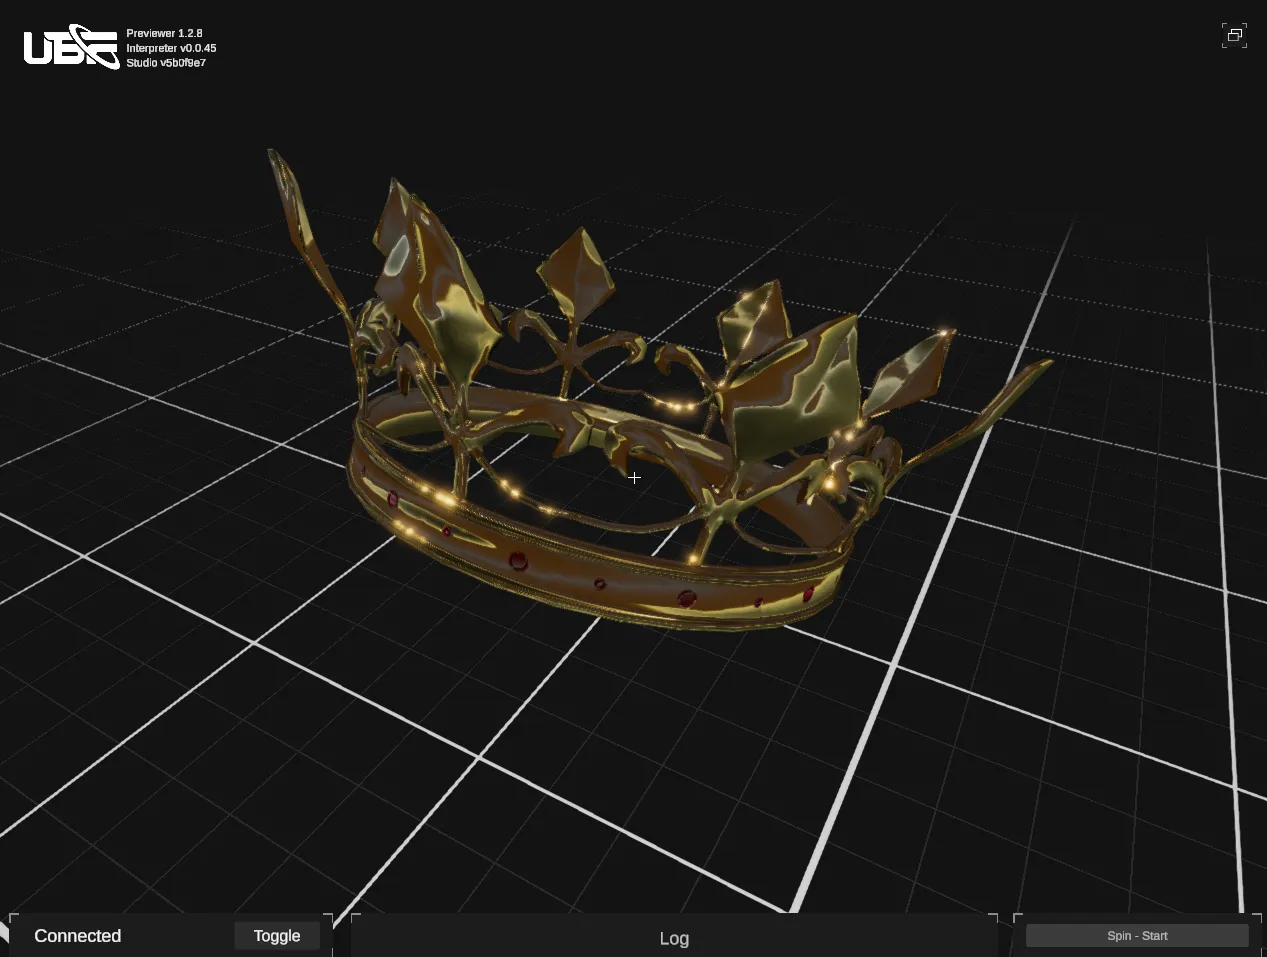
- Crown – Fit for a King
BP_Accessory. This time, however, we’ll use the following overrides to configure our crown:
In-Mesh:PB_Head_Crown.glbIn-DiffuseTexture:T_PB_Crown_Head_BC_1024.pngIn-NormalTexture:T_PB_Crown_Head_NR_1024.pngIn-ORMTexture:T_PB_Crown_Head_ORM_1024.png
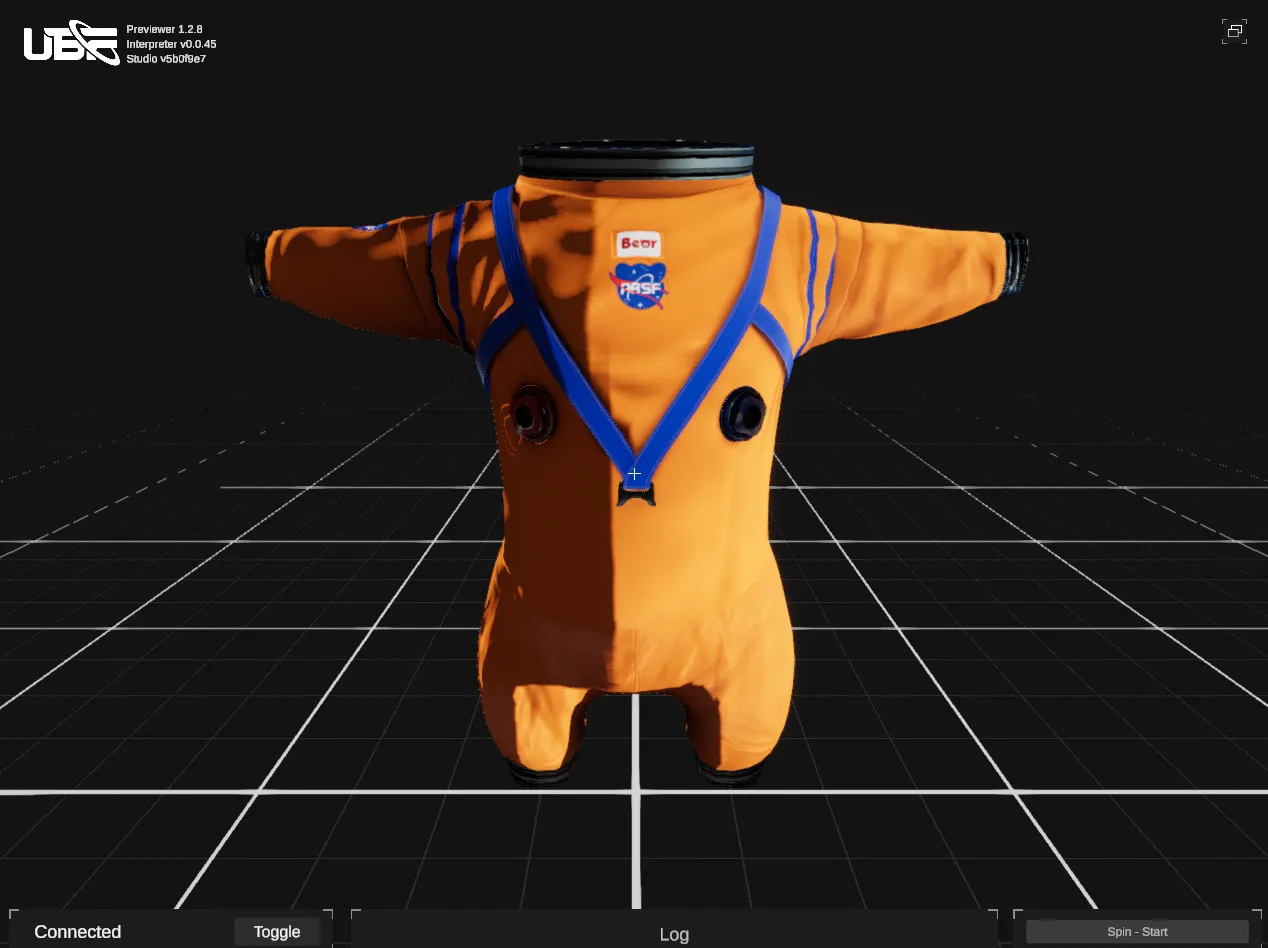
- Space Suit – Ready for Lift Off
BP_Accessory blueprint. Create a new blueprint instance and name it something like BPI_Accessory_Clothing_SpaceSuit. When prompted, select BP_Accessory as the base blueprint.
In the overrides section of the instance, plug in the following values:
In-Mesh:PB_Clothing_SpaceSuit.glbIn-DiffuseTexture:T_PB_SpaceSuit_Clothing_BC_1024.pngIn-NormalTexture:T_PB_SpaceSuit_Clothing_NR_1024.pngIn-ORMTexture:T_PB_SpaceSuit_Clothing_ORM_1024.png
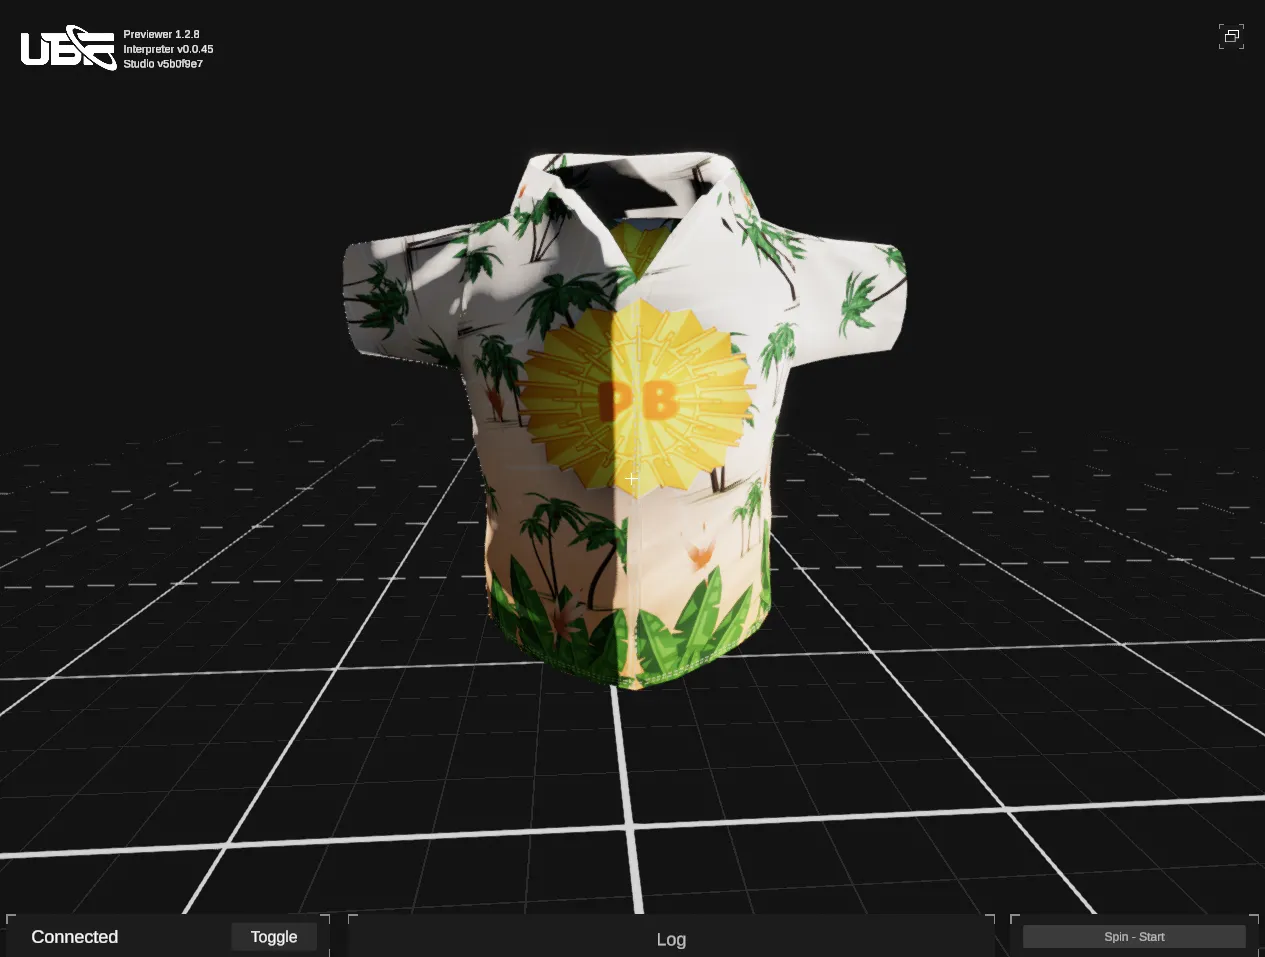
- Hawaiian Shirt – Ready for the Tropics
BP_Accessory blueprint as the foundation.
Create a new blueprint instance in the appropriate folder and name it something like BPI_Accessory_Clothing_HawaiianShirt. When prompted, set its base to BP_Accessory.
In the overrides section, set the following values:
In-Mesh:PB_Clothing_HawaiianShirt.glbIn-DiffuseTexture:T_PB_HawaiianShirt_Clothing_BC_1024.pngIn-NormalTexture:T_PB_HawaiianShirt_Clothing_NR_1024.pngIn-ORMTexture:T_PB_HawaiianShirt_Clothing_ORM_1024.png
- Cyclops Glasses – One Lens to Rule Them All
BPI_Accessory_Eyes_CyclopsGlasses, based on the BP_Accessory blueprint.
In the overrides panel, set the following:
In-Mesh:PB_Eyewear_CyclopsGlasses.glbIn-DiffuseTexture:T_PB_CyclopsGlasses_Eyewear_BC_1024.pngIn-NormalTexture:T_PB_CyclopsGlasses_Eyewear_NR_1024.pngIn-ORMTexture:T_PB_CyclopsGlasses_Eyewear_ORM_1024.png
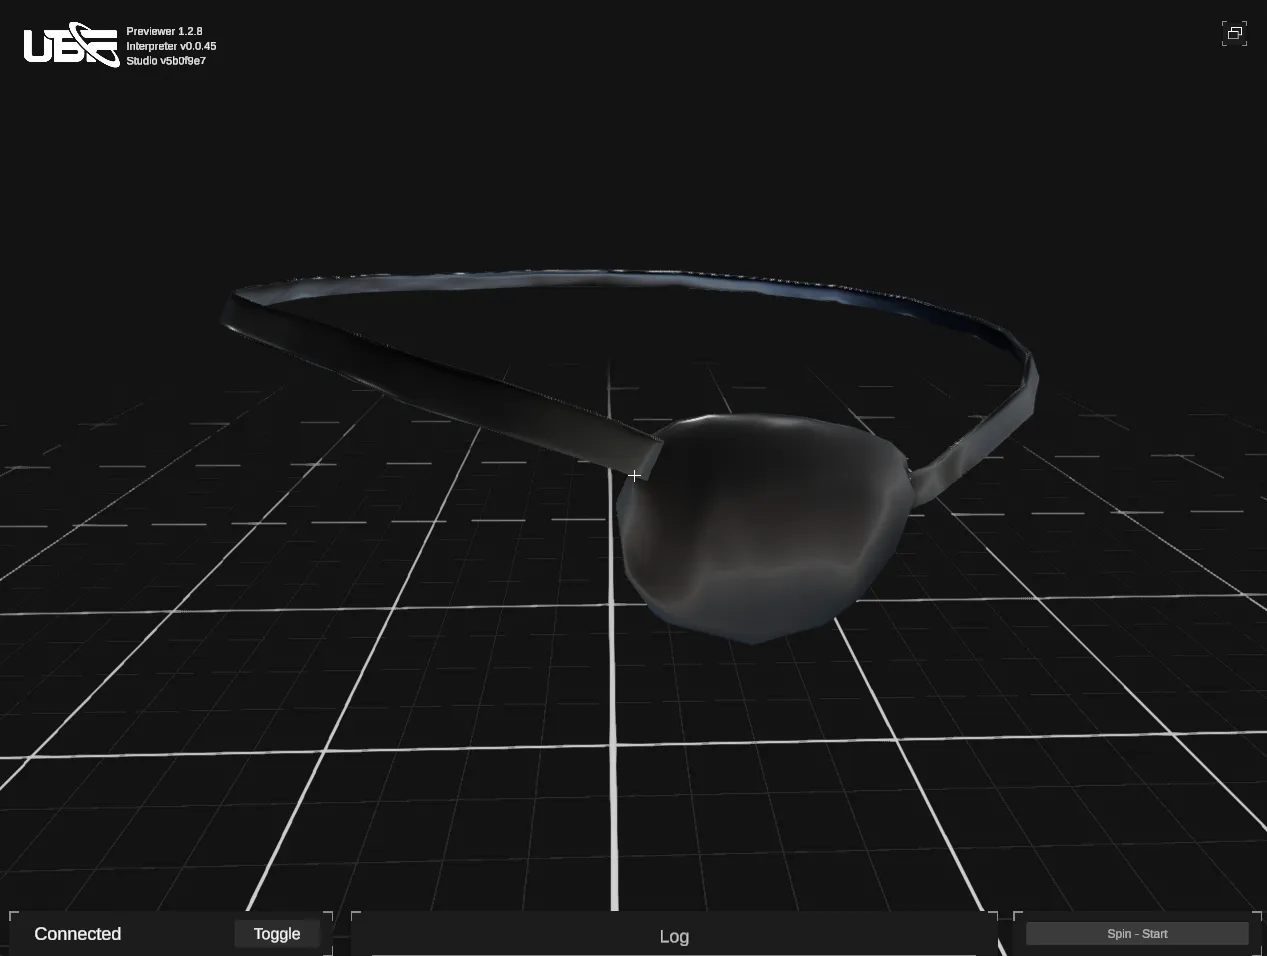
- Eye Patch – A Bear with a Past
BPI_Accessory_Eyes_EyePatch using BP_Accessory as the base.
Apply the following input overrides:
In-Mesh:PB_Eyewear_EyePatch.glbIn-DiffuseTexture:T_PB_EyePatch_Eyewear_BC_1024.pngIn-NormalTexture:T_PB_EyePatch_Eyewear_NR_1024.pngIn-ORMTexture:T_PB_EyePatch_Eyewear_ORM_1024.png
Dressed to Impress — Equipping Our Bear with Accessories
We’re almost there—our Party Bear is fully built, and we’ve put together a wardrobe of stylish accessories. Now, it’s time to teach our bear how to wear those accessories by wiring them into our mainBP_Bear blueprint.
Leveraging our Bear’s Skeleton
Before we start making use of our accessory blueprint instances, remember that both our accessories and our eyes need a skeleton to bind to. Specifically, each of these blueprints expects an input calledIn-Skeleton, which refers to the MeshRenderer of the bear’s body. This allows the meshes to animate correctly in sync with the bear’s movements.
Now here’s the catch: the bear’s body mesh is actually spawned inside the BP_SpawnBody blueprint—not directly within BP_Bear. So we need a way to pass the MeshRenderer back up to the parent blueprint so it can be forwarded to the accessory blueprints.
To do this, we’ll use a Blueprint Output.
Head into the BP_SpawnBody blueprint and open the Blueprint Outputs section in the inspector. Create a new output of type MeshRenderer and call it Out-BodySkeleton.
You may recall that right after spawning the body, we stored the first MeshRenderer in a variable called BodySkeleton. All we need to do now is expose that as an output. At the end of the graph, add a SetOutputs node. This node allows you to specify what values to return to the parent blueprint. Connect the BodySkeleton variable to the Out-BodySkeleton input pin.
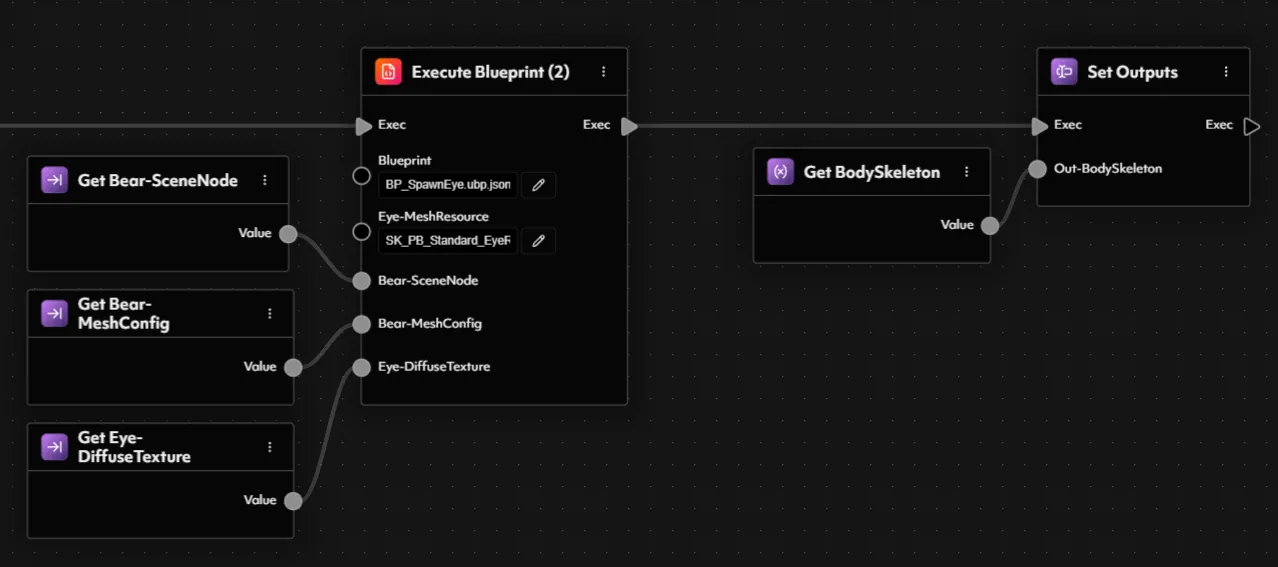
BP_SpawnBody itself, you should also make sure to connect the BodySkeleton variable to the In-Skeleton input on both of your BP_SpawnEye blueprint calls.
BP_Bear blueprint, you’ll now notice that the ExecuteBlueprint2 node calling BP_SpawnBody now exposes an output pin for Out-BodySkeleton. Let’s store this value in a new variable named BodySkeleton of type MeshRenderer. We can then use this variable to feed the In-Skeleton input of our clothing accessory node.
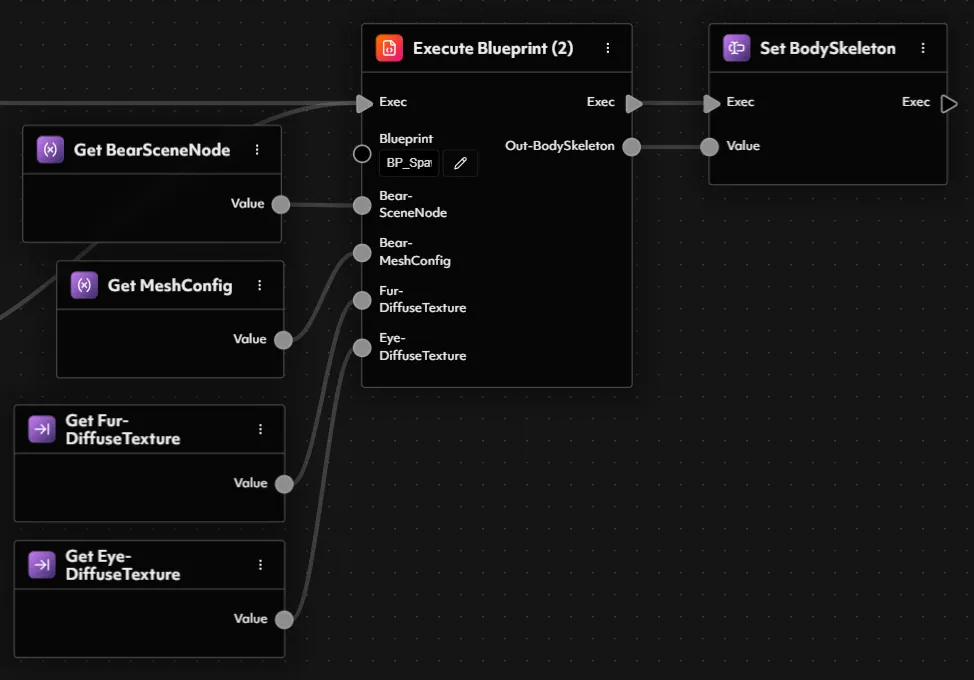
Equipping our First Accessory
Time to make use of our created Accessory Blueprint Instances. To do that, we’ll now add a newExecuteBlueprint2 node and tack it on to the end of our execution logic.
When working with the ExecuteBlueprint2 node, you can select a specific blueprint or blueprint instance directly from the dropdown. Once selected, UBF Studio automatically populates the node’s inputs and outputs to match the selected blueprint’s interface. You can try this now by selecting one of the accessory blueprint instances we created earlier—such as BPI_Accessory_Clothing_HawaiianShirt—and you’ll see all of the exposed inputs appear:
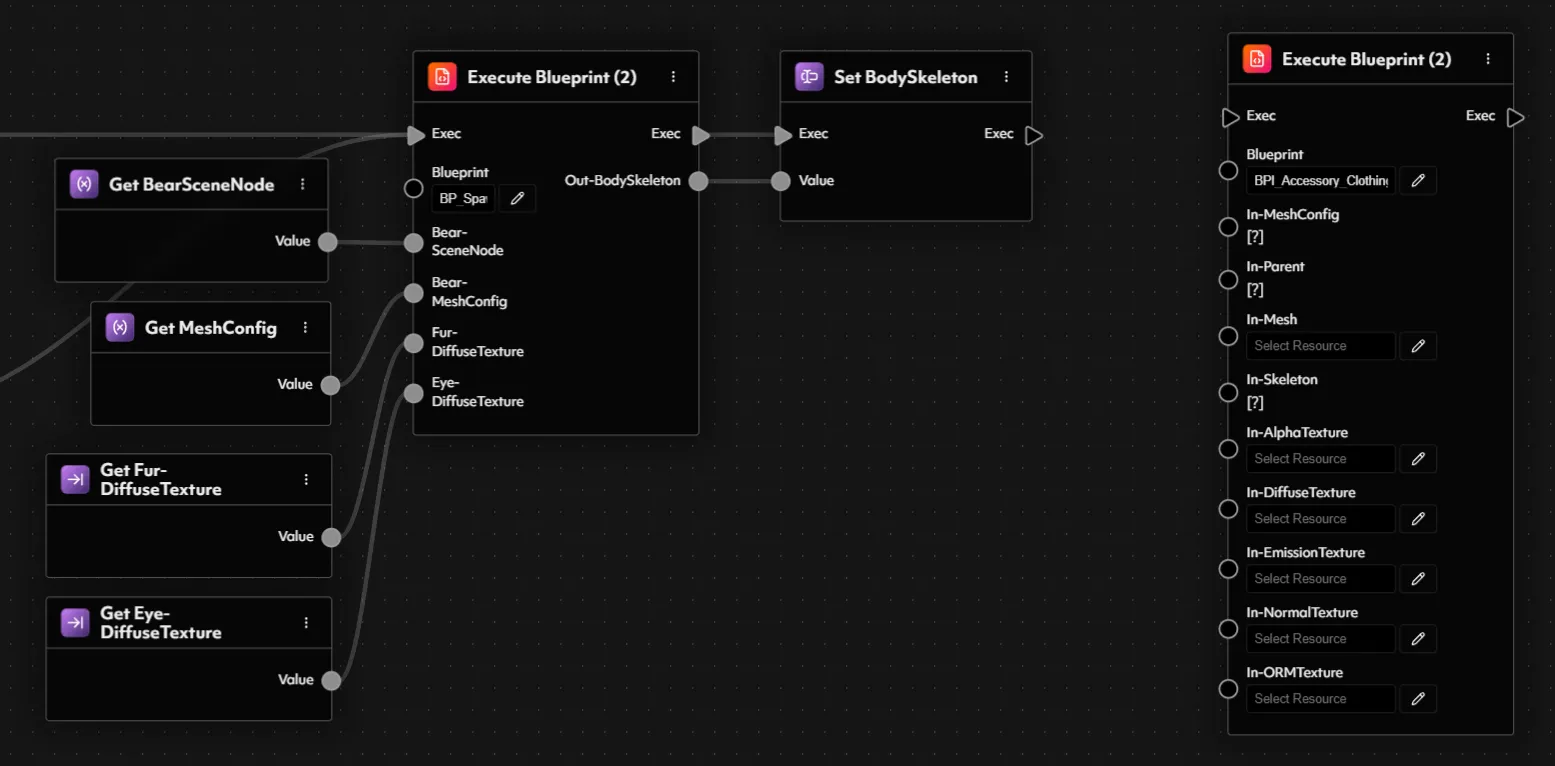
MeshConfig, SceneNode (Parent), and Skeleton. The rest of the parameters—like Mesh, Textures, and other visual elements—should be defined by the blueprint instance we pass in. Unfortunately, if we select a blueprint instance directly in the node, any unassigned fields are still overridden as null—which unintentionally wipes out the default values inside the instance. In other words, we’re nullifying the behavior of the instance even if we leave those fields empty.
To work around this limitation, we’ll create a lightweight blueprint that acts as a template or interface definition. It won’t contain any logic or nodes—it simply mirrors the signature of the inputs we want to pass explicitly into our accessory blueprint. We’ll call it BP_AccessoryTemplate.
In your Accessories folder, create a new blueprint and name it BP_AccessoryTemplate. Inside the Blueprint Inspector, add the following inputs—ensuring the names and types match exactly with those from BP_Accessory:
In-MeshConfig—MeshConfigIn-Parent—SceneNodeIn-Skeleton—MeshRenderer

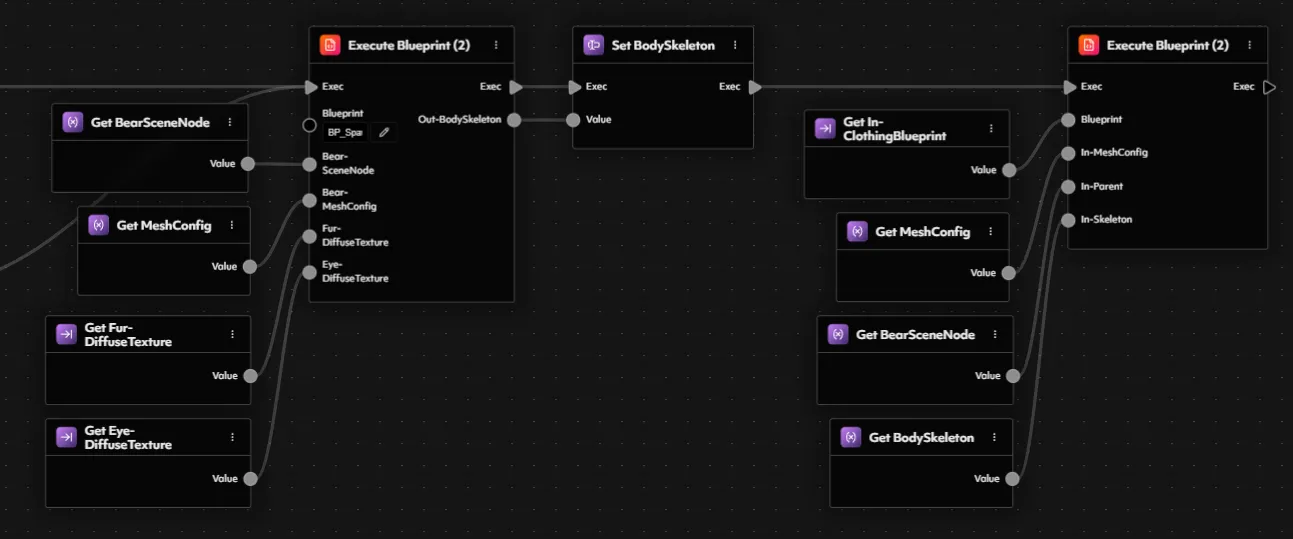
BP_Bear blueprint. In your ExecuteBlueprint2 node, select BP_AccessoryTemplate from the dropdown. You’ll notice the node now exposes only the three inputs we care about—perfect for our needs.
Even though the node is configured with this template, we don’t actually want to run that blueprint. At runtime, we want to dynamically execute the real blueprint instance—like the Hawaiian shirt. To support this, we’ll create an input into BP_Bear that allows us to specify which accessory blueprint (or blueprint instance) should be used.
Open the Blueprint Inputs section in the inspector panel and create a new input of type Resource<Blueprint>. Name it In-ClothingBlueprint. Then, simply drag in the new input into the blueprint and connect it to the Blueprint input pin on the ExecuteBlueprint2 node.
Finally, connect the three required input pins using the variables we’ve already prepared:
MeshConfig→In-MeshConfigBearSceneNode→In-ParentBodySkeleton→In-Skeleton
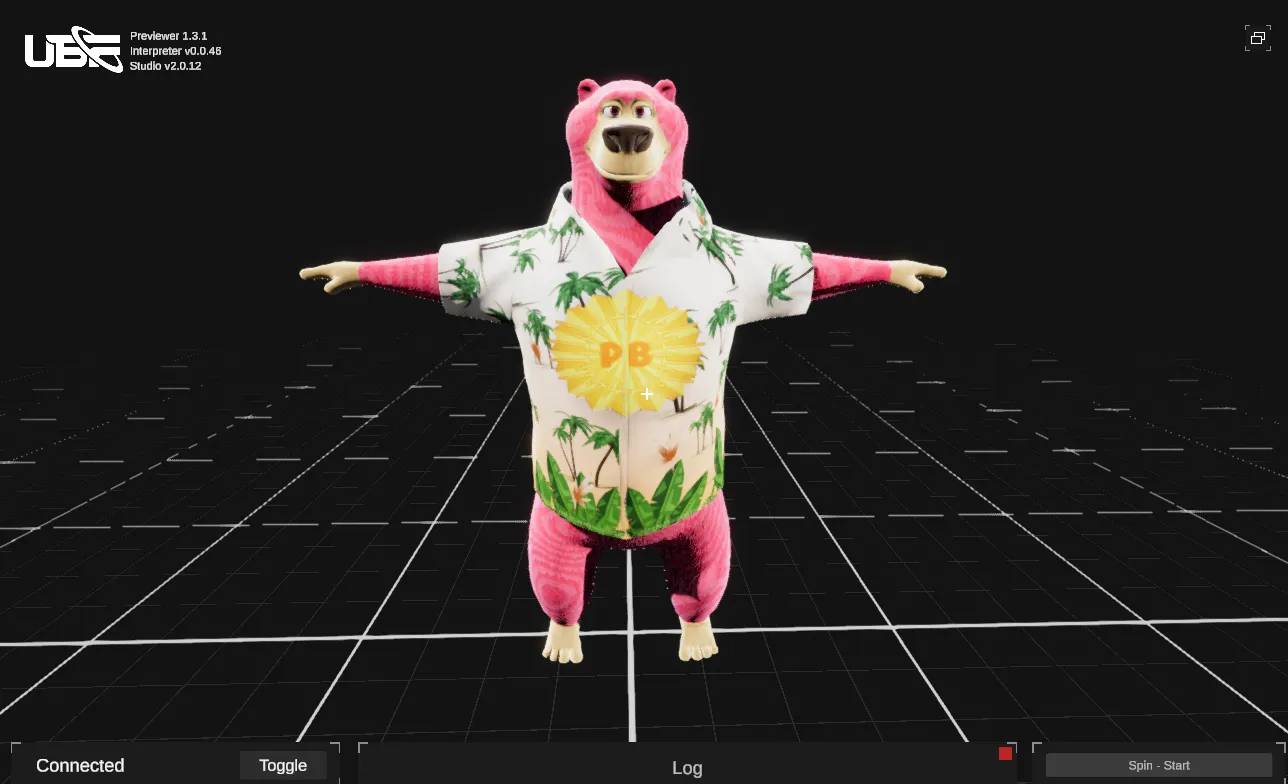
BPI_SimpleBear blueprint instance and set the In-ClothingBlueprint field to one of your accessory instances—let’s go with the Hawaiian shirt for that perfect summer vibe.
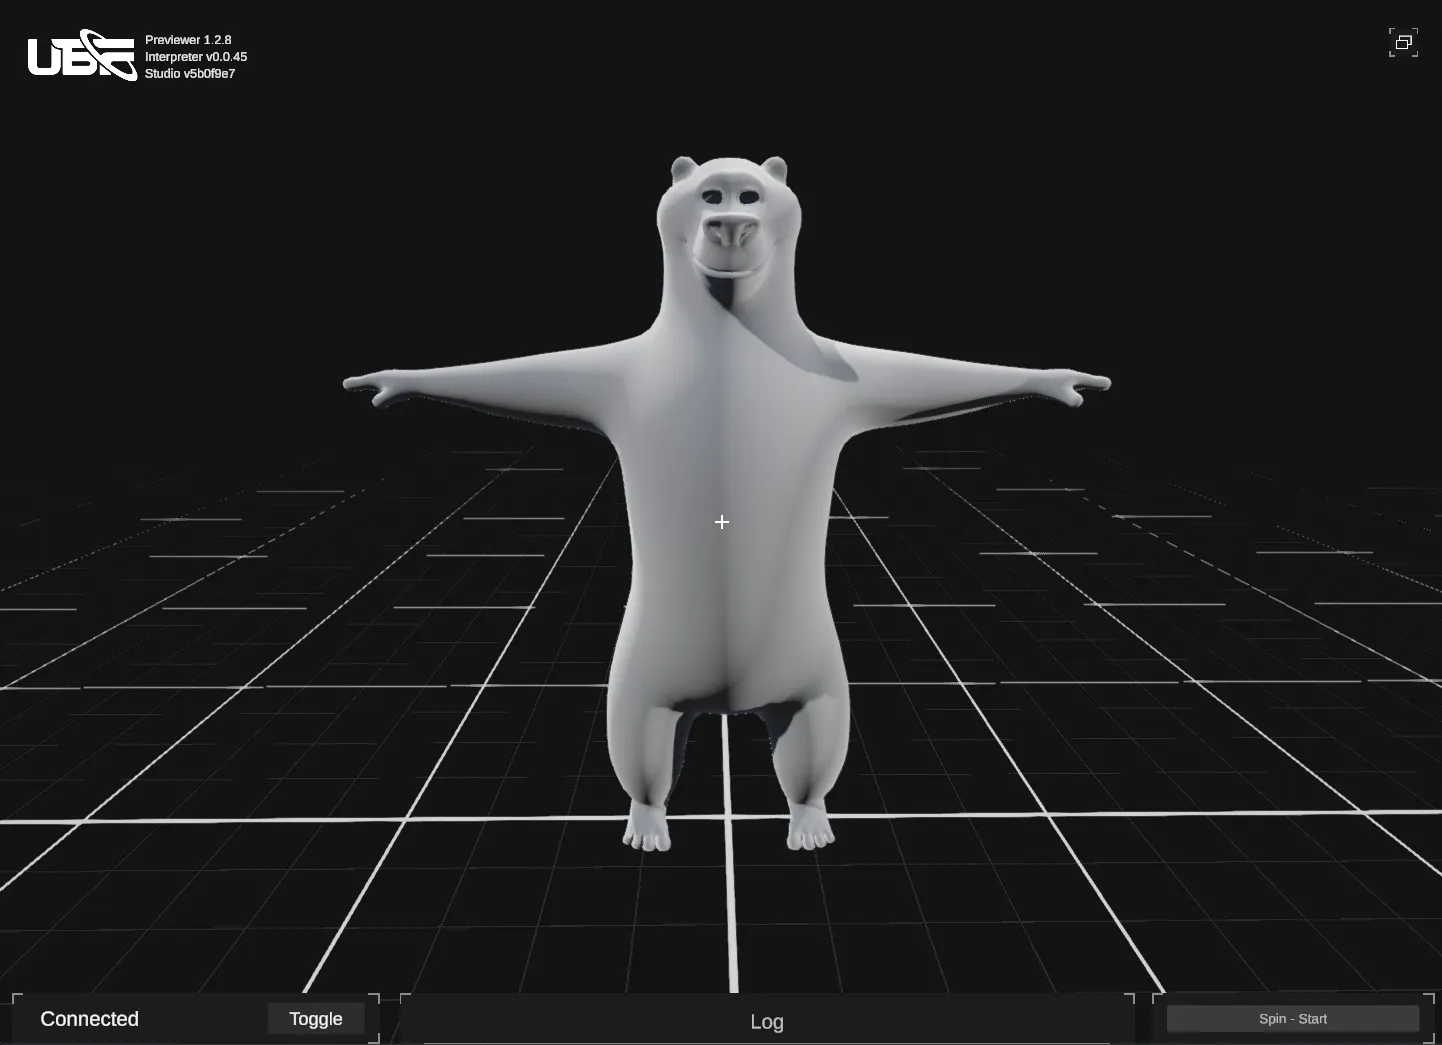
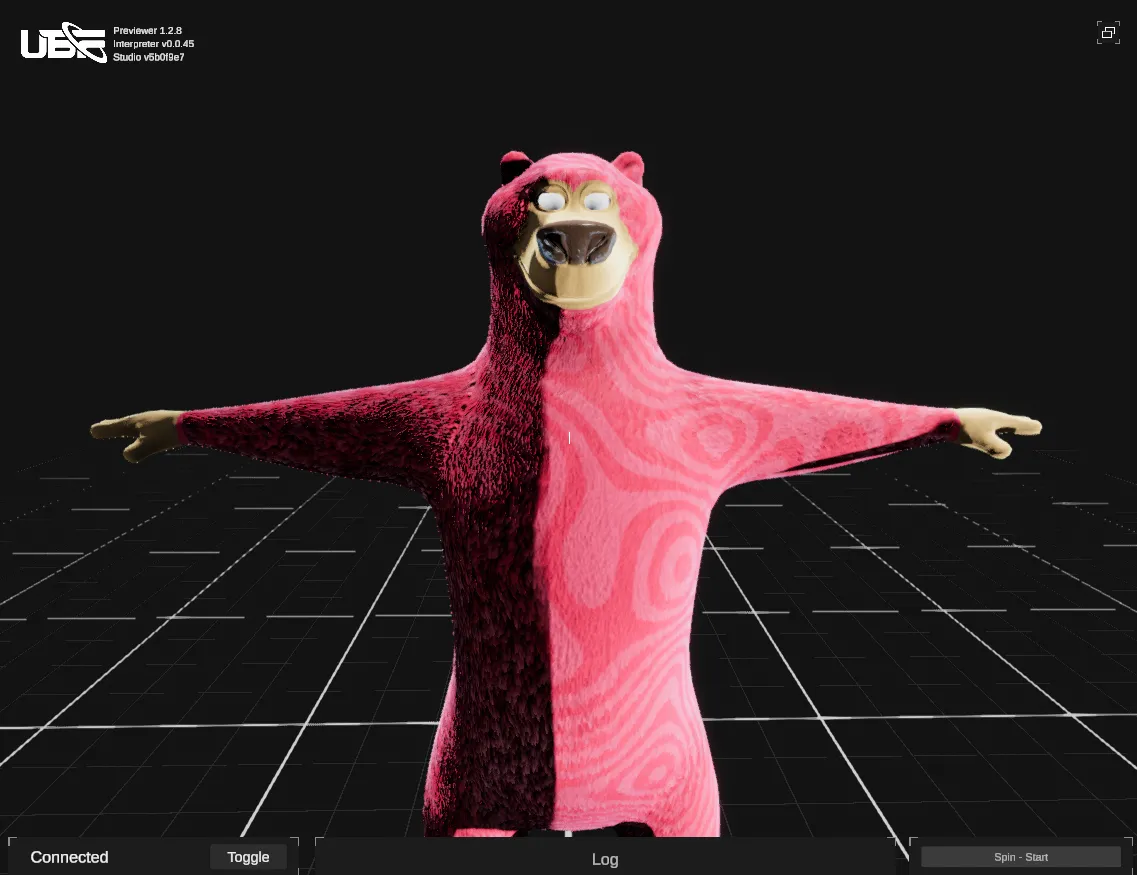
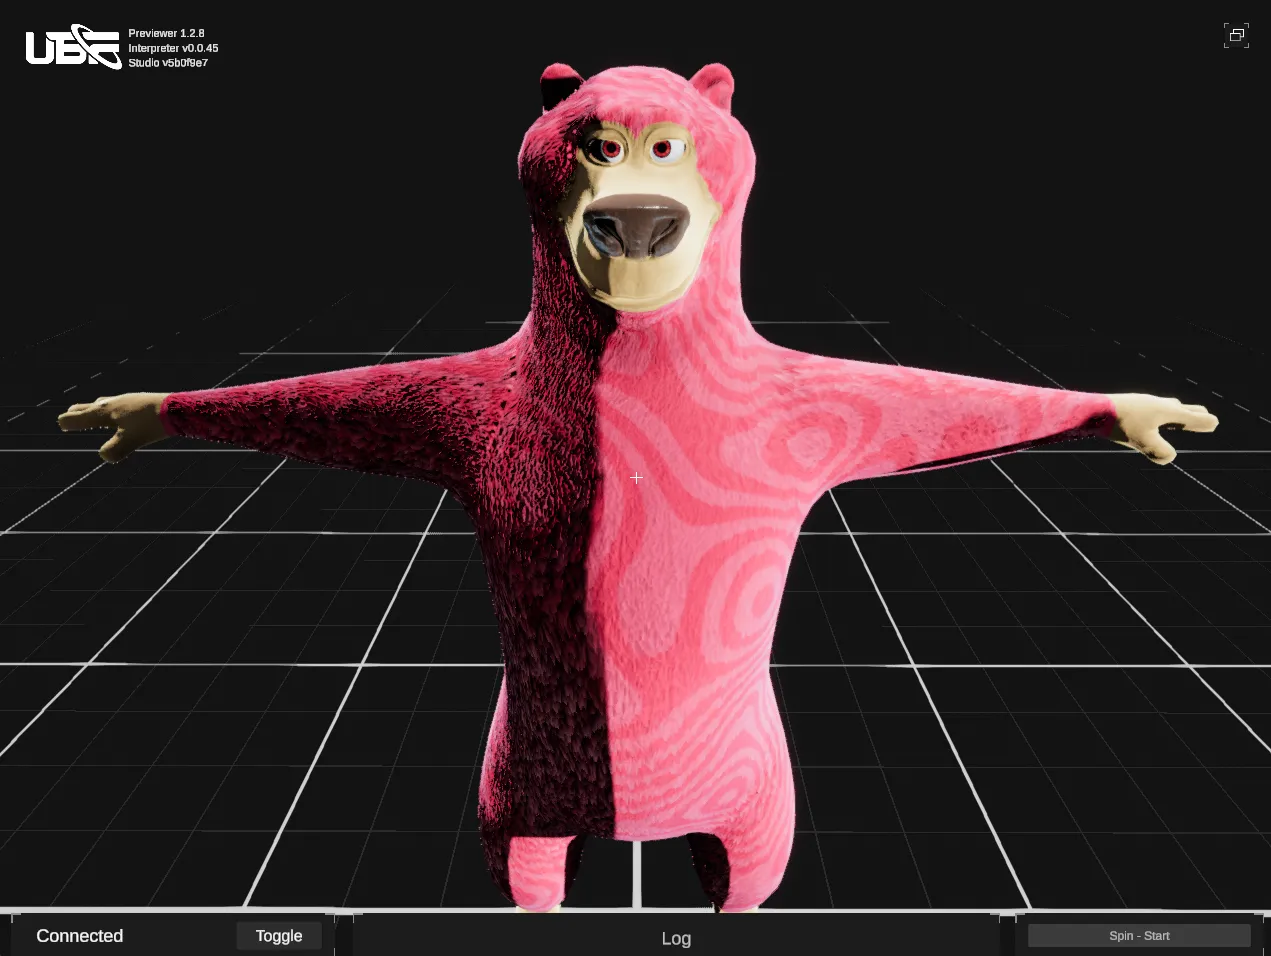
Save your instance, open the UBF Previewer, and hit Preview in the top-right corner of the viewport.
You should now see your fully dressed bear, complete with laid-back island style—ready to party like it’s luau season in Fluf World!
Note: When previewing, you will likely see an error log stating:
[SpawnMesh] Failed to get input 'Config' - this is an expected log and it occurs because the Previewer does not have any built-in configs.The Full Ensemble
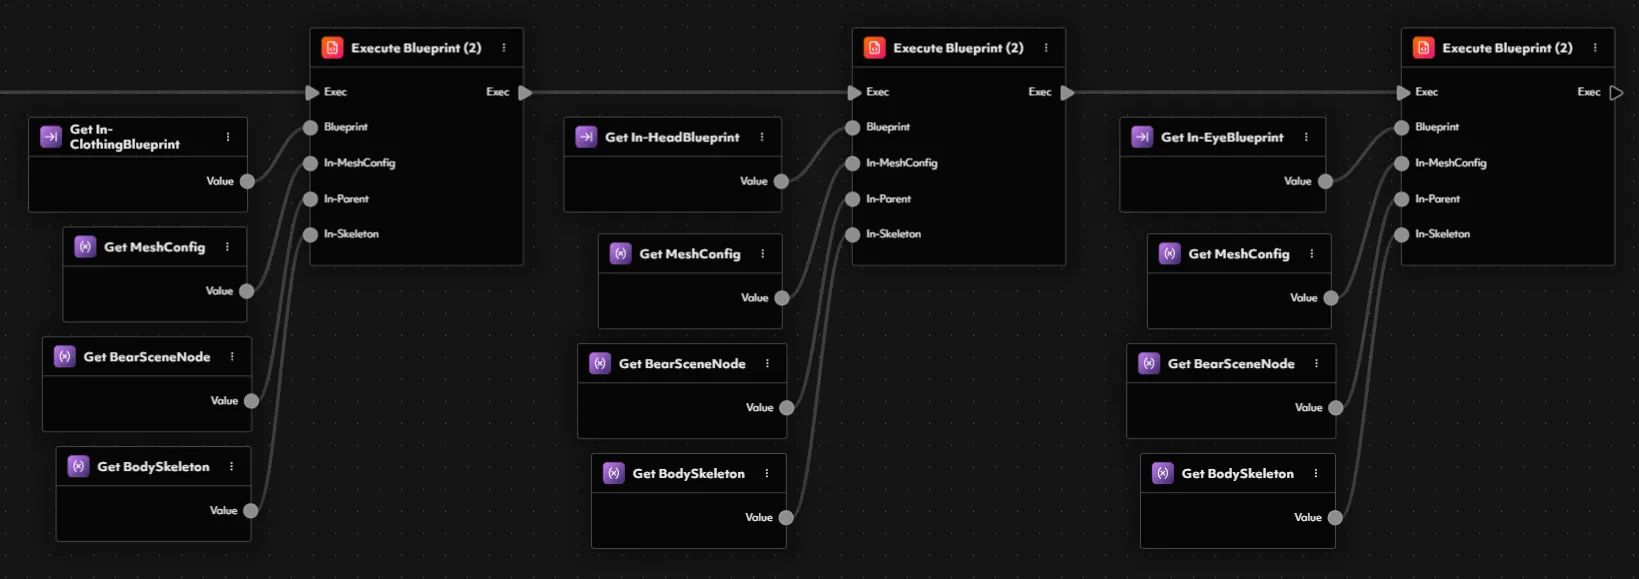
With the clothing slot complete, all that’s left is to wire up the rest of the accessory slots we want to support—Head and Eyes. Just like before, add two new inputs to yourBP_Bear blueprint:
In-HeadBlueprint→Resource<Blueprint>In-EyeBlueprint→Resource<Blueprint>
ExecuteBlueprint2 nodes—one for each accessory type—and connect them in series at the end of your existing execution flow. For each node:
- Set the blueprint to
BP_AccessoryTemplateto expose the correct input signature. - Connect your existing variables to the corresponding input pins:
MeshConfigBearSceneNodeBodySkeleton
- Finally, override the
Blueprintinput by plugging in the matchingIn-HeadBlueprintorIn-EyeBlueprintinput variable.
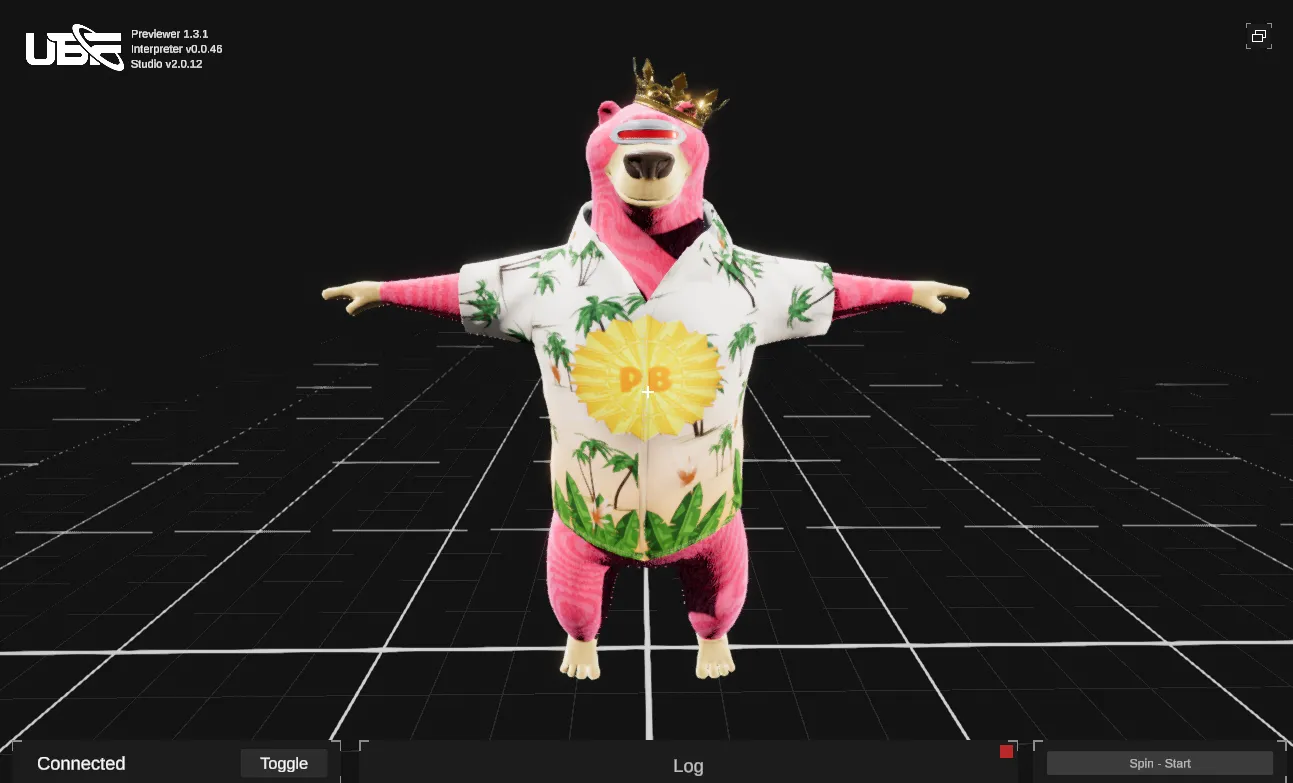
BPI_SimpleBear blueprint instance, and you should see both In-EyeBlueprint and In-HeadBlueprint as available fields. Select your favorite blueprint instances for each slot—we’ll go with Cyclops Glasses and the Crown—hit Preview, and there you have it…
A party-ready bear with full drip, from head to toe!
That’s a Wrap—Fluf World’s Freshest Fit
You’ve done it! We’ve gone from a humble base blueprint to a fully modular, mix-and-match dressing system worthy of the Fluf World Fashion Show runway. With just a few reusable components—smart use of nested blueprints, input parameters, and dynamic blueprint instances—we’ve given Party Bear the ultimate wardrobe. From cozy beanies to space suits, and stylish eyewear to royalty-approved crowns, your bear can now dress for any occasion… in real time, no patching required. Even better, this system is fully extensible. Add new accessories, create more blueprint instances, or even build an entire outfit manager—the possibilities are endless. Whether Party Bear is headed to a beach party, outer space, or a secret pirate rave, he’ll always be dressed to impress. So go ahead, hit that Preview button one last time and watch your bear shine.